Jonny Langefeld
Software Engineer

All views expressed are my own and not affiliated with current or former employers.
nextux.ai - Fill Forms with Your Voice
I recently launched a new side project called nextux.ai. It’s a simple web app that allows you to fill entire forms with your voice. It’s powered by OpenAI and Next.js. Check out the demo video below:
You can try it out yourself at nextux.ai.
Currently the project is just a versatile demo to show what’s possible with OpenAI’s Whisper model and functions. It shows that you can get any structured data out of an audio recording. I think this could be useful to call centers or to simplify UIs like flight search engines or long website forms. It could also serve as accessibility feature for people who find it easier to speak to a computer rather than type and use their mouse. If you have other ideas this technology could be used, let me know on X @jonnylangefeld. Some future ideas involve streaming audio so that you see the form filling out in real-time as you speak.
In the following sections I will go into more detail into the technologies I chose for this project and why I chose them.
React and TypeScript
These are some well-proven technologies that power most of the web today. I personally wanted to get more experience with TypeScript and React so this project was a great excuse to do just that. I really like the capabilities that TypeScript adds to vanilla javascript and that any javascript code still works in TypeScript. And React is obviously great to build dynamic web apps with live updates anywhere. For instance the ability to flip the form to a code editor and live update the form was super easy to build in React.
Next.js and Vercel
I chose Next.js because it’s a great framework for building React apps. It’s very easy to get started with and it comes with a lot of features out of the box. It supports server-side rendering which makes it super fast. It also scales seamlessly from 1 user to 100s of 1000s of users. My favorite feature of vercel must be the preview deployments, which allows you to preview every commit/PR in a separate environment. This is super useful for testing and reviewing changes before they go live.
Styling with Tailwind CSS and daisyUI
I saw more and more projects that inspired me using Tailwind CSS so I wanted to see what the hype is all about. I really like the utility-first approach and the
fact that you can build a beautiful UI without writing a single line of CSS. I also like that Tailwind never gets into your way if a CSS feature is not
supported yet. For instance, for the 3D flip effect I needed a perspective CSS property which is not yet supported by Tailwind. But with the
[perspective: 3000px] class notation I could still use it.
I’ve seen many people mention the long list of classes as a downside of Tailwind. However, I think Tailwind is best used in combination with React, where everything that’s reusable should be a component anyway. And with that all the styling that’s need for a certain component just lives right next to the actual component. I find that easier compared to separate CSS files, where I first have to find which selectors apply.
I used daisyUI as a Tailwind plugin to get some nice looking components out of the box. I liked that daiyUI just adds more custom classes to Tailwind and otherwise works exactly the same. For instance even the Tailwind code completion and class sorting in my IDE VS Code still works with the additional daisyUI classes without any further configuration. And with that you get a consistent UI, where some smart open source community spent a lot of thought on the design.
OpenAI
As a major player in the AI space, OpenAI is a great choice for any AI project. I really like their API design and how fair the pricing is. The
Whisper model has an outstanding speech to text recognition. One major feature that nextux.ai makes
use of is function calling. It guarantees a valid json response for a given
json schema. This json schema is used to render the form using
react-jsonschema-form and to define the output of the OpenAI API response, so it serves a double duty.
I’m really excited as to what OpenAI has up their sleeves next and am looking forward to trying it out.
Feature Flags with Hypertune
I realize that this project with a single developer probably doesn’t present the most urgent necessity to integrate feature flags. However, one reason for this
project was for me to try out and integrate new technologies that I am excited about and Hypertune fell right in that niche. It was easy to
get started and everything is based off a GraphQL schema.
The hypertune library translates that then into TypeScript types that can be used in your project. I for instance
used it to skip expensive API calls during development. Rather than calling the Whisper API every time I wanted to test something on the form, I just had a
feature flag to skip the API call and always respond with a hard coded transcript:
if ((await flags()).skipExpensiveAPICalls().get(false)) {
  return "Hello, my name is Peter";
}
Logging with Betterstack
For logging I chose Betterstack. I really liked how easy it was to integrate by just setting an environment variable and then wrapping the next.config.js
withLogtail() using the @logtail/next library. Follow
their quick start if you want to do the same. I’m also a fan of their beautiful UI and how easy it is to
send meaningful logs. All I have to do is attach objects to a log line and they show up as searchable json objects.
let logger = log.with({ env: process.env.NODE_ENV });
const response = await openAI.chat.completions.create(chatCompletionRequest);
logger = logger.with({ response });
logger.info("successfully returned");
I am also a big fan of services that offer a free tier that just helps you to verify the technology without paying for it just yet. Perfect for side projects like this and you’ll see this schema throughout the technologies I chose for this project.
Emails with Plunk
One more thing I wanted to try out and have as a building block for future projects was a wait list feature that allows me to collect email addresses and send emails to all collected addresses later on. I looked into services like getwaitlist.com, but really thought this feature was simple enough to build myself, which would also offer me more flexibility as to how it looks.

First, I really wanted the glassmorphism background for the modal, which makes the background look blurry. I used this as the modal, inspired by the daisyUI modal.
<form method="dialog" className="modal-backdrop bg-opacity-10 bg-clip-padding backdrop-blur-md backdrop-filter">
  <button>close</button>
</form>
Then I used Plunk to send the emails upon submit. Of course the code to send emails has to live on the server, so that no tokens get
exposed to the client. So I used Next.js server actions. That’s essentially just a
function call that you can do in the client code, but it calls a function that is marked with "use server" and so the compiler will only add this into the
server code. From there I was just able to call the Plunk API to send the emails.
const { success } = await plunk.emails.send({
  to: email,
  subject: "🚀 Welcome to nextUX!",
  subscribed: true,
  body,
});
One additional cool thing I wanted to mention here is that even the email body itself is a React component, built with react-email.
Testing with JEST and POLLY.JS
I’m a big fan of starting with tests early on in a project. It just helps so much for test-driven development, which is to start with tests first and then fill
in the actual code. This means that every bit of code can be executed right away with a debugger. Jest is a great and well-proven framework to define your tests
and execute them. In my case I like to have my test files right next to the actual code files. This is different to most TypeScript projects I’ve seen, where
test files are often in a /test directory. But I really like how the Go community is doing tests, where every test file is a sibling to the actual code file.
So I would always have to files like route.ts and route.test.ts.
For code that calls APIs, like in my case the Whisper and Chat Completion API by OpenAI, you don’t want to call the actual API every time you run your tests. It
would create unnecessary costs and would make your tests fail if the upstream dependency is down. For that I love to do API integration tests with API
recordings. I’ve previously used this principle in various go projects using dnaeon/go-vcr. It essentially functions like
a real VCR, where you first record a real API call against the actual upstream during development. Every aspect of the API call such as the URL, headers,
request and response body is recorded and stored in a json file. Then during tests, the actual API call is replaced with a mock that reads the recorded json
file and returns the response from there. This way you can run your tests without having to call the actual API. And if you want to update the API call, you can
just delete the recorded json file and run the test again. It will then record the API call again and store it in a new json file. This way you can easily
update your API calls and make sure they still work as expected.
I have found POLLY.JS for this project, which is the JavaScript equivalent to go-vcr. It works very similar and is
replaying the OpenAI API calls upon every test run. I used the following functions to strip API calls of any credentials, so that they don’t get checked into my
repository:
const stripTokens = (_: any, recording: any) => {
  if (recording) {
    if (recording.request) {
      if (recording.request.headers) {
        recording.request.headers = recording.request.headers.map((header: { name: string; value: string }) => {
          if (header.name === "authorization") {
            header.value = "Bearer: test-token";
          }
          return header;
        });
      }
    }
  }
};
This can then be used in a regular jest test like this:
beforeEach(() => {
  const { server } = context.polly;
  server.any().on("beforePersist", stripTokens);
});
API Types Defined with protobuf
The API types are defined using protobuf and the source of truth is stored in .proto files. The fields are then annotated with
ts-to-zod annotations. I then added a script to my package.json that generates TypeScript types and zod schema
from the protos:
protoc --proto_path=./proto --plugin=./node_modules/.bin/protoc-gen-ts_proto --ts_proto_out=./src/app/lib/proto ./proto/*.proto && ts-to-zod --all
This part could have been technically done the same way as described above, with Next.js server actions. But I really wanted a re-usable API, that’s also callable from outside it’s dedicated UI. Protobufs are perfect for this, as you can create the client, server and documentation from the same source of truth. So far I’m only using it to generate the same types and validation to use in the client and the server, but one thing I’d like to try out in the future is to create the actual Next.js routes from proto files using Connect. A great example of what I mean can be found here.
CI/CD with GitHub Actions
Lastly, I’m obviously using GitHub to check in my code and have setup GitHub actions to run a workflow upon every commit. The workflow is super simple and runs the linter and the tests:
name: Main

on:
  push:

jobs:
  lint-test:
    name: Lint & Test
    runs-on: ubuntu-22.04
    steps:
      - name: Checkout code
        uses: actions/checkout@v3
      - name: Set up Node.js 18
        uses: actions/setup-node@v3
        with:
          node-version: 18.16.1
      - name: Install Dependencies
        run: npm install
      - name: Run Lint
        run: npm run lint
      - name: Run Tests
        run: npm test
The Vercel GitHub integration then takes care of the deployment and the previews.
Conclusion
And that’s it for now. I hope you enjoyed this write-up and maybe even can derive something that you can use on your upcoming projects. If you have any suggestions for improvements, reach out to me on X @jonnylangefeld.
Tags: project, typescript, tailwind, daisyui, nextjs, react, openai, ai
KubeCon Keynote
A few weeks ago I had the honor to give a keynote at KubeCon North America 2022. I talked about the challenges of running Kubernetes clusters at scale and how we at Cruise are solving them. The video is now available on YouTube:
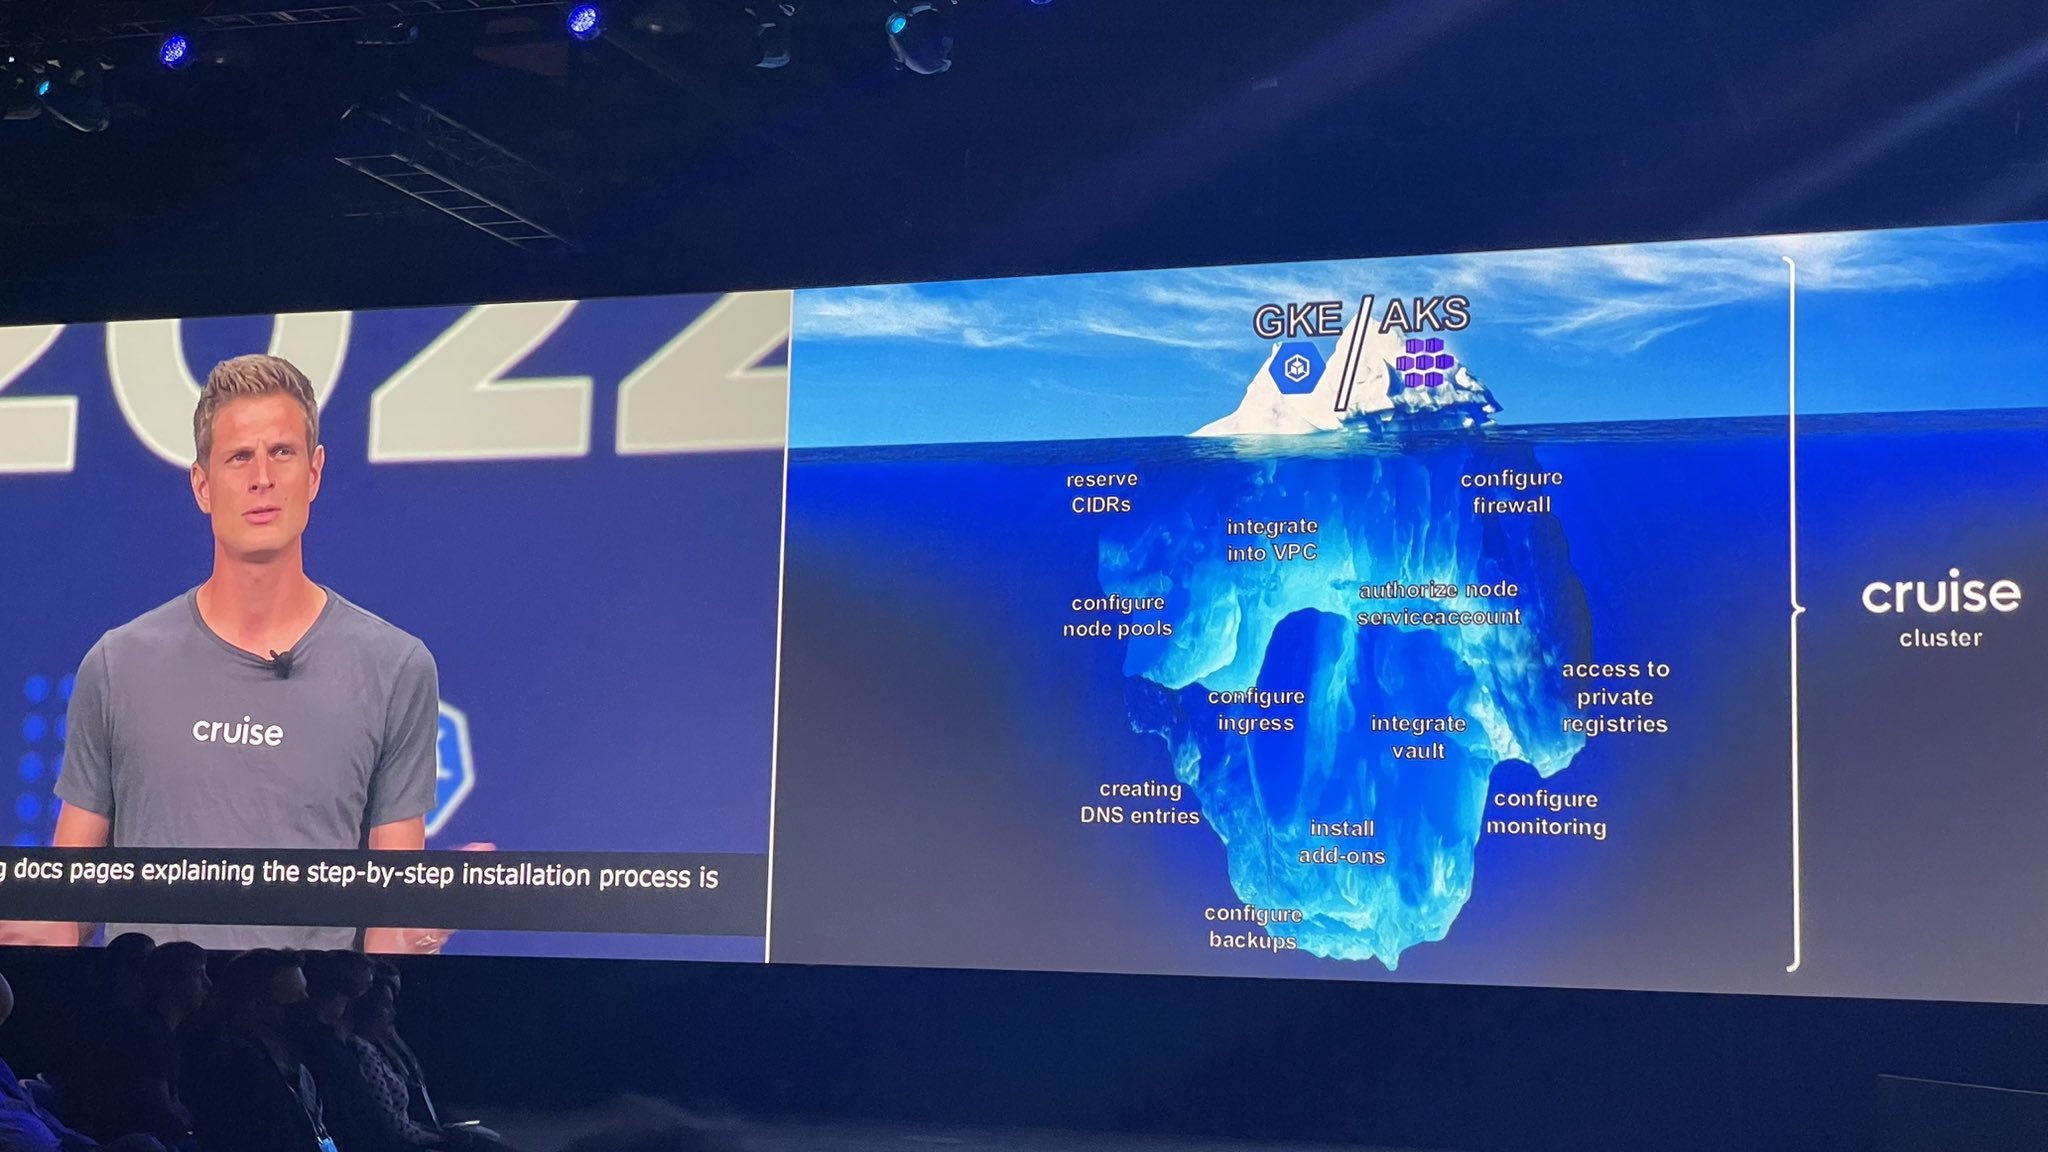
In the keynote I highlighted how we are using Kubernetes operators to majorly increase the automation of our cluster provisioning process. The GCP/AKS/EKS API call to actually create the cluster itself is just the tip of the iceberg of all the things that need to happen to get a cluster ready for production.
We utilize a tree of controllers and the power of custom resource definitions to extend the declarative Kubernetes API to our needs.
When it took an engineer a whole week to provision a cluster manually, it now is a matter of one API call to provision a cluster with the same amount of resources and the actual provisioning process happens asynchronously and hands-off in the background.
More details about our cluster provisioning process can be found in my previous blog post Herd Your Clusters Like Cattle: How We Automated our Clusters.
Tags: kubernetes, cncf, clusters, infrastructure, kubecon
Ingress Hardening at Cruise
This is a cross-post from the original post on LinkedIn.
At Cruise we have a requirement for a highly available central ingress service that can be used by all service owners alike. Our ingress solution of choice is a self managed istio setup. We are choosing istio because we make use of both, the ingress and service mesh components of it.
We started off with an in-cluster ingress service. However, company wide outages started piling up due to the fact that a Kubernetes service with type LoadBalancer on GCP can only have 250 (1,000 on Azure) backends on the provisioned cloud load balancer for internal load balancing. When a kubernetes service with type LoadBalancer is created on a cluster, the cloud native service controller provisions a cloud vendor specific internal L4 load balancer resource. This load balancer pulls a random subset of 250 nodes in the cluster as backends. If the traffic handling istio-ingressgateway pods happened to be scheduled outside this subset and externalTrafficPolicy is set to Local on the Kubernetes service, then all incoming cluster traffic is blocked. This can be technically circumvented by setting externalTrafficPolicy to Cluster which means that incoming traffic can hit a random node and gets forwarded to the correct target node that runs the ingress pod by the kube-proxy daemonset in the kube-system namespace. However, besides the fact that it’s an extra unnecessary network hop, this also does not preserve the source IP of the caller. This is explained in more detail in the blog post “Kubernetes: The client source IP preservation dilemma”. While changing the externalTrafficPolicy to Cluster might work for some services, this was not acceptable for us as our offering is a central service used by many other services at Cruise, some of which have the requirement to keep the source IP.
The interim solution to this was to run the istio-ingressgateway on self managed VMs with the VirtualService resources on target Kubernetes clusters as input for the routing configuration. This resulted in a complex terraform module with 26 individual resources that contained many cloud resources like
- Instance template
- Instance group manager
- Autoscaler
- Firewall
- IP addresses
- Forwarding rules
- Health checks
We essentially had to recreate a Kubernetes Deployment and Service. Since this was running outside the cluster we had to prepare the VMs with a running docker daemon, authentication to our internal container registry and a monitoring agent, which was done via a startup script. All in redundancy to what a Kubernetes cluster would have offered. While this setup mitigated the problem at hand, the complexity of this setup triggered misconfigurations during upgrades. Also the startup script would sometimes fail due to external dependencies potentially resulting in ingress outages.
An additional contributing factor to complexity was that some larger clusters ran the out-of-cluster solution described above, while some smaller, highly automated clusters ran the in-cluster solution. The two solutions were rolled out through different processes (Terraform vs Google Config Connector), requiring separate maintenance and version upgrades. All desired config changes had to be made to both solutions. The path forward was clear: We wanted to consolidate on the in-cluster solution that allows for more automation, less duplication of Kubernetes concepts, single source of truth for configurations, less created cloud native resources (only a dedicated IP address is needed for the in-cluster service) and overall easier maintainability of the service while still working on clusters with more than 250 nodes without sacrificing the source IP.
The Path Forward
For this to be possible we worked closely together with the responsible teams at Google Cloud Platform to deliver features like Container Native Load Balancing, ILB Subsetting and removing unhealthy backends from cloud load balancers as quickly as possible. We provide feedback in multiple iterations of the outcome of our load tests upon which the Google teams implemented further improvements.
Internally we hardened the in-cluster setup with the following:
- Dedicated node pools for ingress pods.
- Allow only one pod per node via anti affinity rules to prevent connection overloading on node level.
- Set the amount of ingress replicas to the
amount of zones + 2. This means that at least one zone has more than one replica. Because the GCP scaling API only allows us to scale by 1 node per zone at a time, it could happen that all nodes get replaced at once if we have only 1 node per zone. With this formula we guarantee that there are always at least 2 running pods. - Set
PodDisruptionBudgetthat requires less healthy pods then desired replicas in the deployment to not block node drains - Set
HorizontalPodAutoscalersbased on memory and CPU usage. - Add a
PreStoplifecycle hook that sleeps for 120 seconds. This is that existing connections are untouched upon pod termination and can run for a full 2 minutes before aSIGTERMis received. - Set
terminationGracePeriodSecondsto 180 seconds to give connections an additional minute to gracefully terminate long running connections after theSIGTERMis received. - Tweak liveness and readiness probes. Liveness probes have a higher failure threshold to prevent frequently restarting pods, while readiness probes have a lower failure threshold to not route traffic while the pod is not healthy.
- Lower resource requests while raising resource limits. This is to achieve a higher likelihood of scheduling on a cramped node while we allow this pod to use a lot of resources if necessary.
Migration
Cluster traffic at Cruise grew along with criticality as we now have fully driverless vehicles on the roads. So the migration from out-of-cluster traffic to in-cluster had to be carefully planned and executed. We specifically had to migrate 3 critical, large clusters across 3 environments (which makes it 9 migrations). We deployed both the in-cluster and out-of-cluster solution in parallel, both with L4 load balancers and a dedicated IP. At this point only an A record swap for our ingress domain was necessary. Client domains use CNAMEs from their service names to our centrally offered ingress domain, so there was no client side change necessary. We carefully swapped the A records slowly cluster by cluster, environment by environment, while closely monitoring the metrics. Our preparation has paid off and we rerouted 100% of all mission critical traffic at Cruise without a blip and without any customer experiencing a downtime.
To learn more about technical challenges we’re tackling at Cruise infrastructure, visit getcruise.com/careers.
Tags: kubernetes, cncf, clusters, infrastructure, ingress, tips & tricks
Tips and Tricks Developing a Kubernetes Controller
This is a cross-post from the original post on LinkedIn.
In an effort to contribute to the Kubernetes controller development community, we want to line out a few of the highlights that truly helped us to implement a production grade controller that is reliable. These are generic so they apply to any Kubernetes controller and not just to infrastructure related ones.
API Integration Tests via gomock
While Kubebuilder already creates an awesome testing framework with Ginkgo and Envtest, which spins up a local Kubernetes API server for true integration tests, it is not complete if your controller has one or more integrations with third party APIs like in our case Vault, Buildkite and others. If your reconciliation logic contains an API call to a third party, it should be mocked during integration testing to not create a dependency or load on that API during your CI runs.
We chose gomock as our mocking framework and defined all API clients as interfaces. That allows us to implement the API clients as a gomock stub during the integration tests and as the actual API client during the build. The following is an example of one of such interfaces including the go:generate instructions to create the mock:
//go:generate $GOPATH/bin/mockgen -destination=./mocks/buildkite.go -package=mocks -build_flags=--mod=mod github.com/cruise/cluster-operator/controllers/cluster BuildkiteClientInterface
type BuildkiteClientInterface interface {
 Create(org string, pipeline string, b *buildkite.CreateBuild) (*buildkite.Build, *buildkite.Response, error)
}
During integration tests we just replace the Create function with a stub that returns a *buildkite.Build or an error.
Communication Between Sub-Controllers
It is often required that one controller needs to pass on information to another controller. For instance our netbox controller that provisions and documents CIDR ranges for new clusters as described in our last blog post needs to pass on the new CIDR ranges to the ComputeSubnetwork as properties, which is reconciled by the GCP Config Connector. We utilize the Cluster resource’s status property to pass along properties between sub-resources. That has the positive side effect that the Cluster resource contains all potentially generated metadata of the cluster in the status field. The root controller which reconciles the Cluster resource implements the logic and coordinates which source property goes to which target.
Server-Side Apply
Server-Side Apply is a Kubernetes feature that became GA in Kubernetes version 1.18 and stable in 1.22. It helps users and controllers to manage their resources through declarative configurations and define ownership of fields. It introduces the managedField property in the metadata of each resource storing which controller claims ownership over which field. That is important because otherwise two or more controllers can edit the same field, changing it back and forth, triggering reconciliation of each other and thus creating infinite loops. When we made the switch to Server-Side Apply, we decided to store each resource as go template yaml file, embed it via go 1.16’s //go:embed and apply it as *unstructured.Unstructured resource. That is even though we have the go struct for the specific resource available. The issue with using the go struct is that empty fields (nil values) count as fields with an opinion by that controller. Imagine an int field on the struct. As soon as a struct is initialized, that int field is set to 0. The json marshaller now doesn’t know if it was explicitly set to 0 or if it is just nil and marshalls it as 0 into the resulting json which gets sent to the API server. With an *unstructured.Unstructured resource we ensure that we only apply fields that the controller has an opinion about. It works very much like a regular kubectl apply at this point. A go template yaml file could look like the following:
apiVersion: iam.cnrm.cloud.google.com/v1beta
kind: IAMServiceAccount
metadata:
  annotations:
    cnrm.cloud.google.com/project-id: {{ .Spec.Project }}
  name: {{ . | serviceAccountName }}
  namespace: {{ .Namespace }}
spec:
  description: "default service account for cluster {{ .Name }}"
  displayName: {{ . | serviceAccountName }}
The template properties get filled through parsing the file using a *Template from the text/template package. The templated yaml file gets parsed into the *unstructured.Unstructured resource and applied via the CreateOrPatch function in controller-runtime. This allowed us to only explicitly set fields we have an opinion about.
This was especially important in conjunction with the GCP Config Connector as it often writes resulting values (e.g. a default cluster version) back to the original spec of the resource. Thus our controller and the GCP Config Connector controller often would “fight” over a field before we rolled out Server-Side Apply, changing it back and forth. With Server-Side Apply a field is clearly claimed by one controller, while the other controller accepts the opinion of the first controller, thus eliminating infinite control loops.
If you implement or build upon any of these frameworks, I’d love to hear about it — reach out to me on Twitter with your feedback!
Tags: kubernetes, cncf, clusters, infrastructure, automation, api, controllers, operators, tips & tricks
Herd Your Clusters Like Cattle: How We Automated our Clusters
This is a cross-post from the original post on LinkedIn.
In 2020, it took one engineer about a week to create a new Kubernetes cluster integrated into the Cruise environment. Today we abstract all configurations and creating a new cluster is a matter of one API call, occupying essentially no engineering hours. Here is how we did it.
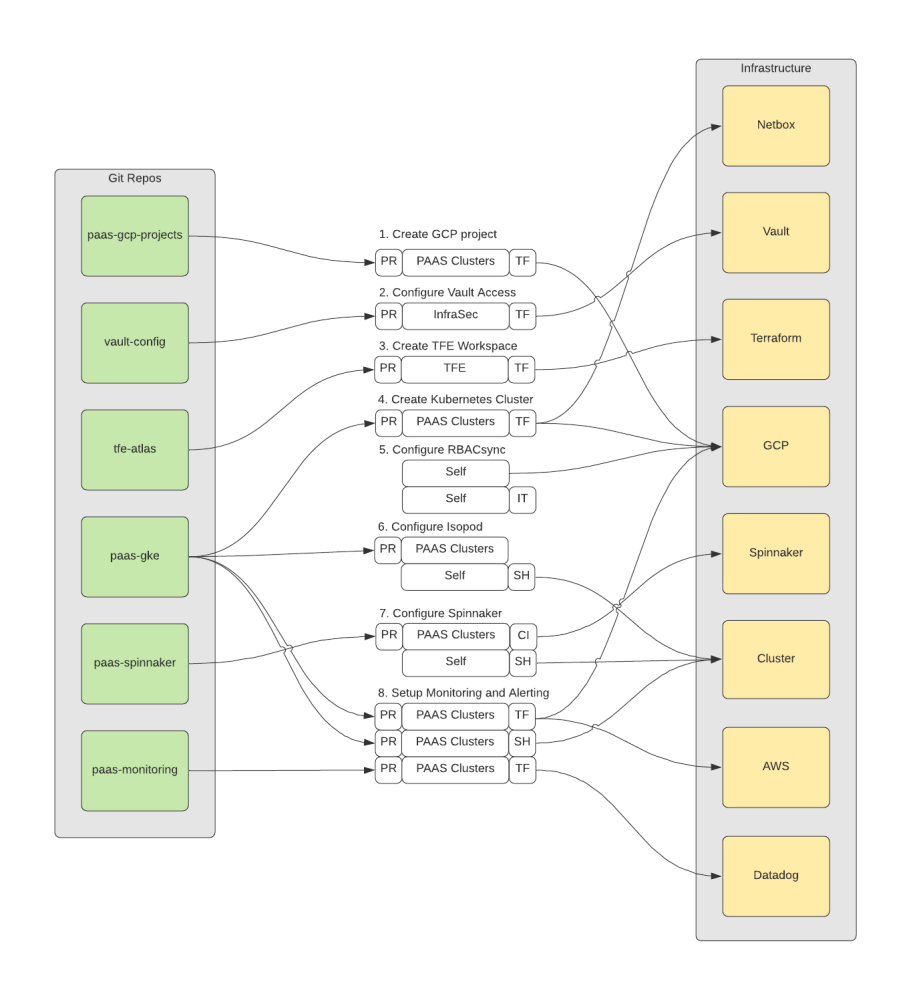
Before, every platform engineer knew each individual Kubernetes cluster by name and whether the workloads running on it were business critical or not. There was an entire set of always running test clusters to rollout new features. Creating a new cluster meant for an engineer to follow a wiki guide that walks you through the exact sequence of steps that has to be performed to create a cluster. That involved a bunch of pull requests to many different repositories. These pull requests had to be executed in a certain order and success of a previous step unblocked another step (like creating a new Terraform Enterprise workspace before applying Terraform resources). The following is already a simplified flow chart of what an engineer had to perform.
While Cruise is using managed Kubernetes clusters on the cloud which technically can already be created with only one API call, there is a bunch of customization that Cruise does to every new cluster. That includes but is not limited to:
- Claiming free CIDR ranges for masters, nodes, pods and services and register them on netbox
- Integration into the internal VPC
- Firewall configuration
- Authorized network configuration
- Creation of cluster node service account and IAM bindings
- Customizing the default node pool
- Creation of a dedicated ingress node pool
- Configuring private container registry access for nodes
- Creating load balancer IP address resources
- Creating DNS record entries
- Creating backup storage bucket
- Vault integration (using the Vault Kubernetes Auth Method + configuring custom Vault roles)
- Configure API monitoring
- Install cluster addons (istio, coredns, external dns, datadog agent, fluentd, runscope agent, velero backup and custom operators to only name a few)
Decommissioning clusters was a simpler but still pretty involved process. Extensive creation and decommissioning processes lead us to treat our clusters as pets.
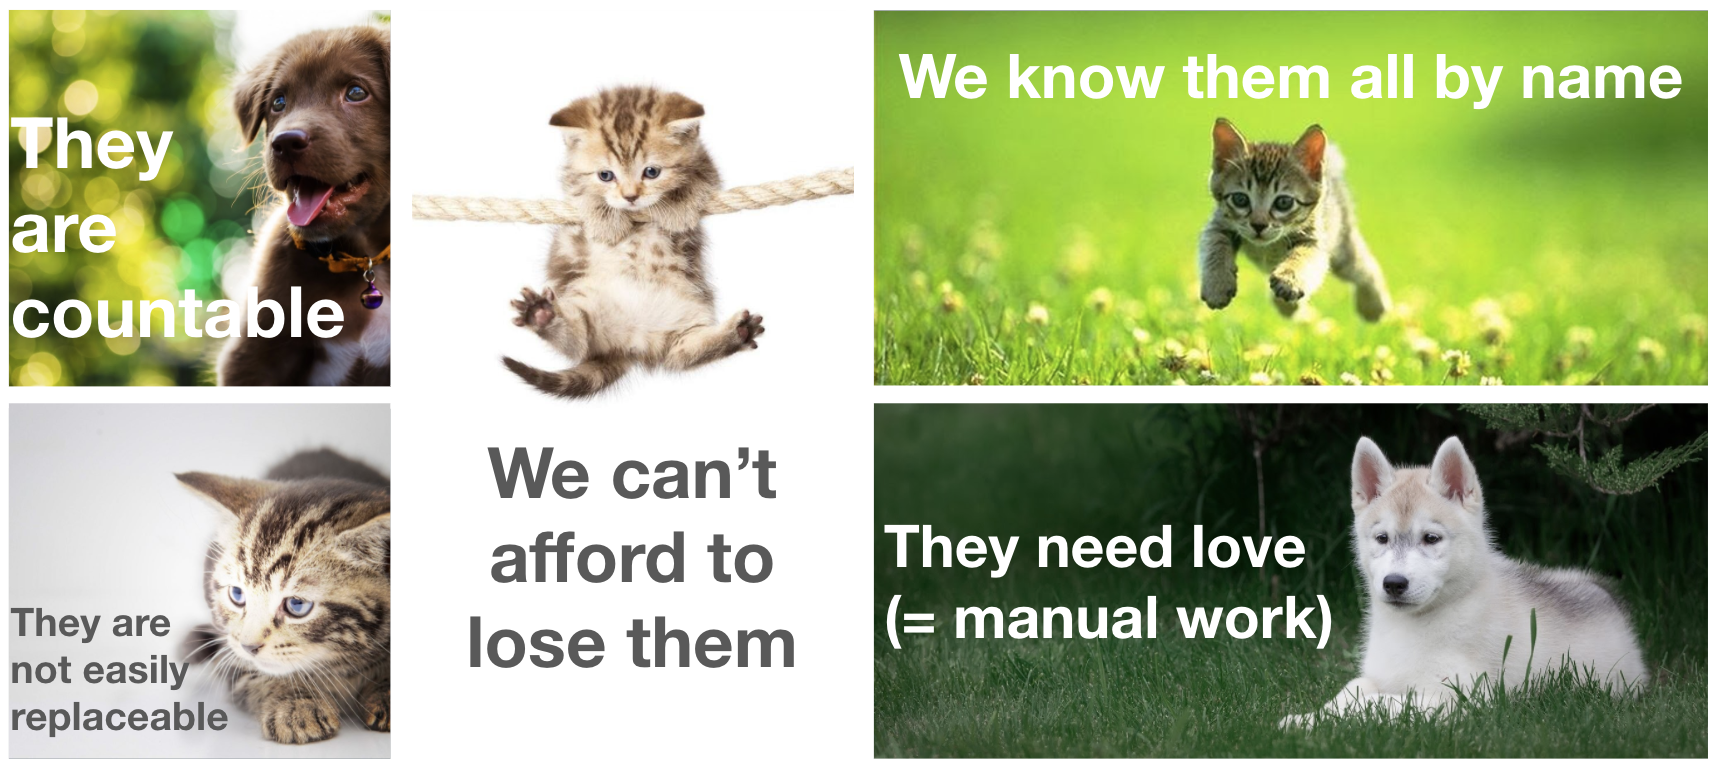
You might ask “But Why is That Bad? - I Love Pets!”. While pets are pretty great, it’s not favorable to treat your clusters like pets, just as it is not favorable to treat virtual machines like pets. Here are a few reasons why:
- It takes time (a lot) to create, manage and delete them
- It is not scalable
- We often conduct risky ‘open heart surgeries’ to save them
- We can’t replace them without notice to users
- We are incentivized to have fewer clusters which increases the blast radius of outages
However, here is what we would like to have:
- Clusters don’t have to be known individually, they’re all just an entry in a database identified by unique identifiers
- They’re exactly identical to one another
- If one gets sick (dysfunctional) we just replace it
- We scale them up and down as we require
- We spin one up for a quick test and delete it right after
All these attributes would not apply to pets, but it does sound a lot like cattle. Bill Baker first coined this term for IT infrastructure in his presentation “Scaling SQL Server” in 2012 [1], [2], [3]. He implied that IT infrastructure should be managed by software and an individual component (like a server) is easily replaceable by another equivalent one created by the same software.
That’s what we have achieved at Cruise through the cluster-operator, a Kubernetes operator that reconciles custom Cluster resources and achieves a desired state in the real world via API calls through eventual consistency.
Bryan Liles’ (VP, Principal Engineer at VMWare) tweet on 1/4/2021 of which Tim Hockin (Principal Software Engineer at Google & Founder of Kubernetes) was affirmative:
I often think about Kubernetes and how it rubs people the wrong way. There are lots of opinions about k8s as a container orchestrator, but the real win (and why I think it is great) is the core concept: Platform for managing declarative APIs. Infra APIs have never been better.
— Bryan Liles (@bryanl) January 4, 2021
Even though work for the cluster-operator started before that tweet, it is yet a perfect expression for what we were trying to achieve: A declarative infra API that expresses a desired state and a controller that asynchronously reconciles to eventually reach that desired state. We utilized kubebuilder for the original scaffolding of our operator. Kubebuilder is maintained by the kubernetes special interest group and creates an initial code base with all best practices for controllers (using controller-runtime under the hood). That includes watchers, informers, queuing, backoff retry, and the entire API architecture including automatic code generation for the custom resource definitions (CRDs). All we had to do was to create controllers and sub-controllers and fill the reconciliation stubs with business logic. Kubebuilder is also used by other major infrastructure operators like the GCP Config Connector and the Azure Service Operator.
Based on the API we defined as go structs, a custom Cluster resource could look like the following:
apiVersion: cluster.paas.getcruise.com/v1alpha
kind: Cluster
metadata:
  name: my-cluster
  namespace: clusters
spec:
  project: cruise-paas-platform
  region: us-central1
  environment: dev
  istio:
    enabled: true
    ingressEnabled: true
  template:
    spec:
      clusterAutoscaling:
        enabled: false
      minMasterVersion: 1.20.11-gke.13001
The creation of this Cluster resource triggers the main control loop to create sub-resources needed by every cluster. Some of them are proprietary and are reconciled again by other inhouse controllers (examples are a netbox controller that automatically carves out new CIDR ranges for new clusters, a vault controller that automatically sets up the kubernetes auth for the new cluster or a deployment controller that triggers Buildkite deployments via API, among others). Some others are cloud provider specific resources like the ContainerCluster (which is the actual cluster itself), ComputeSubnetwork, ComputeAddress, ComputeFirewall, IAMServiceAccount and others. Those cloud provider specific resources would get reconciled by the GCP Config Connector in this case, so we didn’t have to implement the GCP API layer and authentication. All we had to do was to communicate with the Kubernetes API server and create those resources. At the time of writing the creation of the Cluster resource triggers the creation of 16 such sub-resources. The relationship between the root controller for the Cluster resource and all sub-resources, which themselves could have sub-resources again, resembles a tree data structure consisting of controllers and their resources.
The yaml of the Cluster resource above can easily be created on a cluster running the operator via kubectl apply -f cluster.yaml and deleted the same way. All provisioning and decommissioning is then handled by the tree of controllers. We created a helm chart around this in which a list of clusters is maintained. The helm chart then applies all the Cluster resources. That way cluster creation and decommissioning is still tracked and reviewed via git ops and it’s bundled in a single PR of a few lines with essential properties. In fact most of the properties are defaulted as well, so that you could hypothetically create a Cluster resource just with a name set.
Of course this is also available via the raw Kubernetes API under /apis/cluster.paas.getcruise.com/v1alpha1/clusters which makes this integratable with any other software. Imagine a load test that spins up a cluster, performs the load test, stores the result and deletes the cluster right after.
Notice the difference between .spec and .spec.template.spec in the Cluster resource above. While .spec is supposed to hold generic, cloud agnostic properties defined by us, the .spec.template.spec holds cloud vendor specific properties, much like the equivalent template spec on a Kubernetes native deployment that contains the spec of the underlying desired pod. This is realized through a json.RawMessage struct field that allows for any arbitrary json/yaml on that field. It gets parsed into a map[string]interface{} for further usage and its properties are used to override the chosen defaults on the core ContainerCluster resource. It is important to preserve unknown fields via // +kubebuilder:pruning:PreserveUnknownFields to allow the input yaml/json to contain any fields the cloud provider specifies (or will specify in the future).
Conclusion
This cluster provisioning and decommissioning via a single API call has allowed us to treat clusters as cattle. We create them for quick tests and experiments, delete them again, move noisy neighbors to dedicated clusters and manage the properties and configuration of all our clusters centrally. Clusters are owned by well tested production-grade software and not by humans anymore. What used to cost days of engineering work was minimized to a few minutes of human attention to enter some cluster metadata. We’re not only automating a fleet of cars, but also a fleet of clusters.
Tags: kubernetes, cncf, clusters, infrastructure, automation, api, controllers, operators
The Kubernetes Discovery Cache: Blessing and Curse
This blog post explores the idea of using Kubernetes as a generic platform for managing declarative APIs and asynchronous controllers beyond its ability as a container orchestrator, and how the discovery cache plays into that consideration.
It all started for me with a tweet by Bryan Liles (VP, Principal Engineer at VMWare) almost a year ago, to which Tim Hockin (Principal Software Engineer at Google & Founder of Kubernetes) agreed:
I often think about Kubernetes and how it rubs people the wrong way. There are lots of opinions about k8s as a container orchestrator, but the real win (and why I think it is great) is the core concept: Platform for managing declarative APIs. Infra APIs have never been better.
— Bryan Liles (@bryanl) January 4, 2021
I think this is so true. Kubernetes embodies a lot of principles of the perfect API. Every resource has a group, a version, and a kind, it offers extendable metadata, a spec for input data (desired state) and a status of the resource (actual state). What else do you wish for? Also the core Kubernetes controllers like the deployment controller, pod controller, autoscaler controller and persistent volume claim controller are perfect examples of asynchronous controller patterns that take a desired state as input and achieve that state through reconciliation with eventual consistency. The fact that this functionality is exposed to Kubernetes users via custom resource definitions (CRDs) makes the entire platform incredibly extendable.
Controllers like crossplane.io, GCP Config Connector or Azure Service Operator have adopted the pattern to a large degree and install 100s, if not 1,000s of CRDs on clusters. However that doesn’t come without its drawbacks…
These drawbacks aren’t due to high load on the Kubernetes API server. In fact, that actually has a pretty robust and advanced rate limiting mechanism through the priority and fairness design that most likely will ensure that the API server doesn’t crash even if a lot of requests are made.
However, installing many CRDs on a cluster can impact the OpenAPI spec publishing, as well as the discovery cache creation. OpenAPI spec creation for many CRDs has recently been fixed through implementing lazy marshalling. While an interesting concept, this could be the topic of another blog post as in this one we are focusing on the latter: discovery cache creation.
It started with more and more log messages like the following when using regular kubectl commands:
Waited for 1.140352693s due to client-side throttling, not priority and fairness, request: GET:https://10.212.0.242/apis/storage.k8s.io/v1beta1?timeout=32s
What’s interesting is that this immediately excludes the priority and fairness mechanism described earlier and talks about ‘client-side throttling’. My first instinct, however, was just to suppress the log line because I hadn’t asked kubectl to print any debug logs for instance, with -v 1. I found this issue on kubernetes/kubernetes pursuing the same goal and gave it a thumbs up in the hope to just suppress this annoying log message that you couldn’t switch off. However, as the discussion on that PR progressed and specifically this comment, saying that “this log message saves 10 hours of debugging for every hour it costs someone trying to hide it”, got me thinking that there must be more to the story and that merely not printing the log message is not the right approach. The PR eventually was closed without merging.
This led me down the rabbit hole of looking at some kubectl debug logs, and I found that a simple request for pods via kubectl get pod -v 8 led to 100s of GET requests à la
GET https://<host>/apis/dns.cnrm.cloud.google.com/v1beta1?timeout=32s
GET https://<host>/apis/templates.gatekeeper.sh/v1alpha1?timeout=32s
GET https://<host>/apis/firestore.cnrm.cloud.google.com/v1beta1?timeout=32s
This was on a cluster that already had a few controllers installed, like the GCP Config Connector or Gatekeeper. I noticed the group versions like dns.cnrm.cloud.google.com/v1beta1 or templates.gatekeeper.sh/v1alpha1 in the debug output relating to those controllers even though I simply queried for pods.
It occurred to me that these many GET requests would ultimately trigger the client-side rate limiting and that those GET requests were made to populate the discovery cache. This reddit post helped me understand this behavior and I also reported this back on the original Kubernetes issue regarding those ominous log messages, which triggered the community to raise a new issue altogether regarding a fix for client side throttling due to discovery caching.
The Discovery Cache
But why do we even need 100s of requests in the background for simply querying pods via kubectl get pods? That is thanks to the ingenious idea of the Kubernetes discovery client. This allows us to run all variations of kubectl get po, kubectl get pod, kubectl get pods and the Kubernetes API server always knows what we want. That becomes even more useful for resources that implement categories, which can trigger a kubectl get <category> to return various different kinds of resources.
The way this works is to translate any of those kubectl commands to the actual API server endpoint like
GET https://<host>/api/v1/namespaces/<current namespace>/pods
You see that kubectl has to fill in the <current namespace> and query for /pods (and not for /po or /pod). It gets the <current namespace> through the $KUBECONFIG (which is usually stored at ~/.kube/config), or falls back to default. It is also possible to query pods of all namespaces at once. The way kubectl resolves a request for po or pod to the final endpoint /pods is through a local cache stored at ~/.kube/cache/discovery/<host>/v1/serverresources.json. In fact, there is a serverresources.json file for every group version of resources installed on the cluster. If you look at the entry for pods you will find something like
{
  "name": "pods",
  "singularName": "",
  "namespaced": true,
  "kind": "Pod",
  "verbs": [...],
  "shortNames": [
    "po"
  ],
  "categories": [
    "all"
  ]
}
With this reference kubectl knows that a request for pods, pod (which is the kind), po (which is in the shortNames array) or all (which is in the categories) should result in the final request for /pods.
kubectl creates the serverresources.json for every group version either if the requested kind is not present in any of the cached serverresources.json files, or if the cache is invalid. The cache invalidates itself every 10 minutes.
That means in those cases kubectl has to make a request to every group version on the cluster to populate the cache again, which results in those 100s of GET requests described earlier, and those again trigger the client-side rate limiting. On large clusters with many CRDs kubectl get requests can easily take up to a minute to run through all these requests plus pausing for the rate limiting. Thus it is advisable to not let your CRD count grow limitless. In fact, the scale targets for GA of custom resource definitions is set to 500 in the Kubernetes enhancement repo.
So while the discovery cache is actually adding usability to Kubernetes, it also is the limiting factor for extending the platform with custom controllers and CRDs.
Scaling
Especially the crossplane community has a vested interest in unlocking this limitation because crossplane’s entire design philosophy is built upon the idea of creating CRDs for every object in the real world and reconciling it through controllers. But it will also be important for other controllers introducing many CRDs like the GCP Config Connector or the Azure Service Operator.
For now the aforementioned issue on kubernetes/kubernetes based on my user report regarding many GET requests after a simple kubectl get pods triggered a set of PRs (1, 2) aimed at increasing the rate limits during discovery. However, this is just kicking the can down the road (or as @liggitt correctly put it the ‘kubernetes equivalent of the debt ceiling’) as it’s not solving the underlying issue of many unnecessary GET requests, but merely not rate limiting as often, which still means a strain on resources and that we will run into the same issue again at a later point in time with even more CRDs. While kubectl still performs 100s of GET requests, at least the total run time is roughly cut in half as there is no additional rate limiting anymore with the fixes.
I also raised a separate issue to challenge the status quo of invalidating the cache every 10 minutes by increasing that default, and also to make this timeout configurable (rather than hard coding it). But again, this just raises limits and doesn’t actually minimize the amount of unused GET requests.
So the real, lasting solution might be a bit more involved and require to only GET the serverresources.json of a group version that is actually requested once the cache gets invalid or isn’t present. So a request for kubectl get pods would only populate the ~/.kube/cache/discovery/<host>/v1/serverresources.json file (because pods are in group "" and version v1) rather than every single group version. This would eliminate all unnecessary requests for unrelated resources and majorly reduce the total amount of GET requests. This solution would also require a server-side change to offer an endpoint that reveals all potential group versions for a given kind.
If you have other ideas to solve this, feel free to reach out to me, @jonnylangefeld on twitter, to discuss or file an issue directly on kubernetes/kubernetes.
Tags: kubernetes, go, cncf, discovery, sig, api, controllers, operators