Jonny Langefeld
Software Engineer

All views expressed are my own and not affiliated with current or former employers.
How to write a Go API: The Ultimate Guide

“TIL” (today I learned) is an acronym I recently discovered (Example usage: “TIL what TIL means”). Since I’m ESL (English as Second Language) I use the urban dictionary a lot to look up these acronyms. “TIL” turned out to be a very useful term, because it’s true: One never stops learning. And so it happened that I started this blog writing about a Python Flask API and continued with a three part series on how to write a go API. And while there is a lot of valuable information in those posts, today I am writing about what I learned since then and what my current set of best practices is to write an efficient and production ready API.
Reading many blogs myself, I sometimes miss context on given examples. So I published a sample repo which can be found on github. Every code example in this post links to the source lines of this repo.
The following paragraphs feature a large set of best practices and why I like them. Send me an email or tweet me @jonnylangefeld if you feel like something is missing!
Table of Contents
- 1. Project Scaffolding
- 2. The tools.go Pattern
- 3. Command Line Flags With pflag
- 4. Structured Logging With zap
- 5. Graceful Exits
- 6. Log Version on Startup
- 7. Define Types in Their Own Package
- 8. chi as HTTP Framework
- 9. Custom Middlewares
- 10. Pagination
- 11. Database Integration With gorm
- 12. Database Integration Tests With dockertest
- 13. API Integration Tests With gomock
- 14. Render Responses With go-chi/render
- 15. Documentation as Code With http-swagger
- 16. Staged Dockerfile
1. Project Scaffolding
I use the following tree as project layout. More packages can be added under pkg.
├── Dockerfile
├── Makefile
├── docs                    # automatically generated by `make docs`
├── go.mod
├── go.sum
├── main.go                 # main.go in the root rather than in `/cmd` directory
├── pkg
│   ├── api                 # containing all API related functions and the router
│   │   ├── api.go
│   │   ├── api_test.go
│   │   └── operations.go
│   ├── db                  # all database interactions happen in here
│   │   ├── db.go
│   │   └── db_test.go
│   ├── middelware          # for custom middlewares
│   │   ├── context.go
│   │   └── logger.go
│   └── types               # our types get a separate package
│       └── types.go
├── readme.md
└── tools.go                # tools.go to manage tool versions via go.mod
With that out of the way, lets look into the main.go file.
2. The tools.go Pattern
I’m really a fan of managing tool dependencies also through go modules. That pins their versions and includes them in my vendor directory. Marco Franssen wrote in-depth about this pattern in this blog post.
3. Command Line Flags With pflag
There are many ways to work with command line flags and configurations in go. One can go fancy with viper or stay simple with go’s built in flags package. I like pflag because of it’s simplicity and similarity to go’s own package, yet it offers POSIX/GNU-style flags making it more natural to use on your command line. The sample repo contains an example usage:
func init() {
	pflag.StringVarP(&addr, "address", "a", ":8080", "the address for the api to listen on. Host and port separated by ':'")
	pflag.Parse()
}
(source)
Pflag comes with help built in:
$ go-api -h
Usage of go-api:
  -a, --address string   the address for the api to listen on. Host and port separated by ':' (default ":8080")
4. Structured Logging With zap
This is certainly an opinionated decision, but my favorite logger is zap. It can be configured in all kinds of ways, but I like to keep it very simple. This is the configuration I use:
// configure logger
log, _ := zap.NewProduction(zap.WithCaller(false))
defer func() {
    _ = log.Sync()
}()
(source)
Which gives me a beautiful log output like the following:
{"level":"info","ts":1601686510.597971,"msg":"starting up API...","version":"v1.0.0"}
{"level":"info","ts":1601686510.70517,"msg":"ready to serve requests on :8080"}
{"level":"info","ts":1601686516.446462,"msg":"served request","proto":"HTTP/1.1","method":"GET","path":"/articles","lat":0.002087763,"status":200,"size":13,"reqId":"C02C864PLVDL/gESGYmlmCu-000001"}
{"level":"info","ts":1601686521.3242629,"msg":"served request","proto":"HTTP/1.1","method":"GET","path":"/orders","lat":0.002300746,"status":200,"size":13,"reqId":"C02C864PLVDL/gESGYmlmCu-000002"}
{"level":"info","ts":1601686525.5588071,"msg":"gracefully shutting down"}
5. Graceful Exits
This one is not ultimately necessary but I’ve seen it a lot and ensures cleanup tasks when the API is shutting down. A graceful exit is implemented by making a channel in the beginning of your program and listening for a certain event, like this one for a keyboard interrupt:
// gracefully exit on keyboard interrupt
c := make(chan os.Signal, 1)
signal.Notify(c, os.Interrupt, syscall.SIGTERM)
(source)
At the end of the program, after starting the webserver in a go routine (see #5), we react to the signal:
<-c
log.Info("gracefully shutting down")
os.Exit(0)
(source)
6. Log Version on Startup
This one is also minor, but it turns out to be very useful to see the version by just reading the logs for debugging. It makes it clear which exact code base ran the code and resulted in a potential error.
The version is injected by using an unset version variable in the main.go file and setting it via the build command (for instance in your Makefile):
VERSION ?= $(shell git describe --match 'v[0-9]*' --tags --always)

build:
	@go build -ldflags "-X main.version=$(VERSION)"
(source)
In the main.go file you can use the version as follows (after instantiating it via var version string):
// print current version
log.Info("starting up API...", zap.String("version", version))
(source)
7. Define Types in Their Own Package
Types should be reusable. Let’s say someone was to build a command line interface interacting with your API, they would appreciate if they could just import your API types. So we define types as structs in pkg/types/types.go (we will get to the struct tags and the doc strings later):
// Article is one instance of an article
type Article struct {
	// The unique id of this item
	ID int `gorm:"type:SERIAL;PRIMARY_KEY" json:"id" example:"1"`
	// The name of this item
	Name string `gorm:"type:varchar;NOT NULL" json:"name" example:"Skittles"`
	// The price of this item
	Price float64 `gorm:"type:decimal;NOT NULL" json:"price" example:"1.99"`
} // @name Article
(source)
8. chi as HTTP Framework
My http framework of choice these days is go-chi/chi (upon recommendation by @elsesiy - thank you!) for its light weight, idiomatic implementation, but mainly for its 100% compatibility with net/http allowing you to use any existing middleware.
The server is started as go routine and listens on the configured address:
// start the api server
r := api.GetRouter(log, dbClient)
go func() {
    if err := http.ListenAndServe(addr, r); err != nil {
        log.Error("failed to start server", zap.Error(err))
        os.Exit(1)
    }
}()
(source)
The router gets configured in the api package, setting the db client and the logger:
func GetRouter(log *zap.Logger, dbClient db.ClientInterface) *chi.Mux {
	r := chi.NewRouter()
	r.Use(middleware.RequestID)
	SetDBClient(dbClient)
	if log != nil {
		r.Use(m.SetLogger(log))
	}
	buildTree(r)

	return r
}
(source)
The tree of requests looks in code just as it would like in a folder structure. Every sub request is attached to its parent. Here is an example request tree, that handles articles and orders for a store:
func buildTree(r *chi.Mux) {
	r.HandleFunc("/swagger", func(w http.ResponseWriter, r *http.Request) {
		http.Redirect(w, r, r.RequestURI+"/", http.StatusMovedPermanently)
	})
	r.Get("/swagger*", httpSwagger.Handler())

	r.Route("/articles", func(r chi.Router) {
		r.With(m.Pagination).Get("/", ListArticles)

		r.Route("/{id}", func(r chi.Router) {
			r.Use(m.Article)
			r.Get("/", GetArticle)
		})

		r.Put("/", PutArticle)
	})

	r.Route("/orders", func(r chi.Router) {
		r.With(m.Pagination).Get("/", ListOrders)

		r.Route("/{id}", func(r chi.Router) {
			r.Use(m.Order)
			r.Get("/", GetOrder)
		})

		r.Put("/", PutOrder)
	})
}
(source)
9. Custom Middlewares
In the tree above, you can spot the usage of
		r.Route("/{id}", func(r chi.Router) {
			r.Use(m.Article)
			r.Get("/", GetArticle)
		})
(source)
Custom middlewares live in the middleware package. m is our custom middleware, imported through
m "github.com/jonnylangefeld/go-api/pkg/middelware"
(source)
Custom middlewares are very powerful. They are basically an injection into the sequence of handlers of the api and can do anything ‘along the way’. In this instance we know we are in a part of our router tree, that will always require the article object pulled from the database. So we inject a custom middleware, that does exactly that for us and injects it into the context of the request. The context is available through the entire handler chain, so for any succeeding handler our object will be available.
The following middelware is the http.Handler we used above via r.Use(m.Article) and injects the article object into the context.
// Article middleware is used to load an Article object from
// the URL parameters passed through as the request. In case
// the Article could not be found, we stop here and return a 404.
func Article(next http.Handler) http.Handler {
	return http.HandlerFunc(func(w http.ResponseWriter, r *http.Request) {
		var article *types.Article

		if id := chi.URLParam(r, "id"); id != "" {
			intID, err := strconv.Atoi(id)
			if err != nil {
				_ = render.Render(w, r, types.ErrInvalidRequest(err))
				return
			}
			article = DBClient.GetArticleByID(intID)
		} else {
			_ = render.Render(w, r, types.ErrNotFound())
			return
		}
		if article == nil {
			_ = render.Render(w, r, types.ErrNotFound())
			return
		}

		ctx := context.WithValue(r.Context(), ArticleCtxKey, article)
		next.ServeHTTP(w, r.WithContext(ctx))
	})
}
(source)
Later on in our handlers, we just pull the article from the context, without reaching out to the database again.
func GetArticle(w http.ResponseWriter, r *http.Request) {
	article := r.Context().Value(m.ArticleCtxKey).(*types.Article)

	if err := render.Render(w, r, article); err != nil {
		_ = render.Render(w, r, types.ErrRender(err))
		return
	}
}
(source)
The article object is available for every child in the request tree, which makes these custom middlewares so powerful.
10. Pagination
Click here to read the separate blog post on pagination.
11. Database Integration With gorm
In previous blog posts I have described how I use gorm as an object relational mapping framework in go APIs. That has not changed so far. I like the ease of use and the ability to still write raw SQL if I need to. That especially comes in handy if the underlying database is postgres, which has a bunch of custom features that no ORM would naturally cover. Go check out my old blog post for in-depth coverage.
However, I did change how I interact with the database client. Rather than just using the bare-bone gorm.Open() call in the main() function, I do write a custom client interface, that wraps the gorm client. The custom client interface features a Connect() function to establish the database and a bunch of functions that will be called by the different API endpoints. This interfacing will help us later to write API integration tests with integration tests with gomock.
// ClientInterface resembles a db interface to interact with an underlying db
type ClientInterface interface {
	Ping() error
	Connect(connectionString string) error
	GetArticleByID(id int) *types.Article
	SetArticle(article *types.Article) error
	GetArticles(pageID int) *types.ArticleList
	GetOrderByID(id int) *types.Order
	SetOrder(order *types.Order) error
	GetOrders(pageID int) *types.OrderList
}

// Client is a custom db client
type Client struct {
	Client *gorm.DB
}
(source)
This pattern allows us to still access the underlying client if we ever needed to. Now this does create a funny looking construct that looks like client.Client, but I’ve seen this pattern elsewhere and actually think it is quite useful, to still make lower level function calls available to higher level interfaces.
12. Database Integration Tests With dockertest
Database integration tests are important to be done on a database as close as possible to the one intended to be used in production. That is because databases have many different flavors and they all have their own quirks. Especially for a database like postgres this is important, as postgres offers a lot of custom functions and features, that can’t be replicated through other testing methods like dependency injection.
The best way to create a short-lived database, that’s just there during testing and always has the same state, is through a docker container. That can be easily run locally and on CI systems and ensures that we interact correctly with the actual database.
Just as the last topic, I have describe this concept in a blog post last year and this has probably changed the least since I’ve blogged about it, so the old post is still accurate. To see how it integrates into the sample repository, check the pkg/db/db_test.go file.
13. API Integration Tests With gomock
gomock is a great tool for any kind of integration tests. The basic idea is to mock an interface of another package, so you don’t have to set up a dependency just for testing. Imagine a tool that pulls in data from the Google Calendar API, you don’t want to be dependent on the Google Calendar API up and running during your integration tests. So you mock the dependency. The assumption here is that the used dependency is itself tested properly. The way this is done is through an interface, for which we can replace functions during our tests.
In the scenario of our demo go-api, our API operations depend on the database. That would mean that we need an up and running database for API integration tests. However, we covered proper database integration tests earlier, so now we can assume those database calls are working properly. And to not also depend on the up and running database during API integration tests, we mock the database calls as follows:
First off, add gomock to the tools.go file. Then we’ll add this section to the api integration tests:
//go:generate $GOPATH/bin/mockgen -destination=./mocks/db.go -package=mocks github.com/jonnylangefeld/go-api/pkg/db ClientInterface

func getDBClientMock(t *testing.T) *mocks.MockClientInterface {
	ctrl := gomock.NewController(t)
	dbClient := mocks.NewMockClientInterface(ctrl)

	dbClient.EXPECT().GetArticles(gomock.Eq(0)).Return(&types.ArticleList{
		Items: []*types.Article{
			&testArticle1,
			&testArticle2,
		},
	})

	dbClient.EXPECT().GetArticles(gomock.Eq(1)).Return(&types.ArticleList{
		Items: []*types.Article{
			&testArticle2,
		},
	})

	dbClient.EXPECT().GetArticleByID(gomock.Eq(1)).Return(&testArticle1).AnyTimes()

	dbClient.EXPECT().SetArticle(gomock.Any()).DoAndReturn(func(article *types.Article) error {
		if article.ID == 0 {
			article.ID = 1
		}
		return nil
	}).AnyTimes()

	return dbClient
}
(source)
The first line of this section is important, even though commented out. It tells go generate (which we will call through a Makefile target) that here is an execution to be done. It means that mockgen should mock the ClientInterface in the github.com/jonnylangefeld/go-api/pkg/db package. It does that by creating a new file (./mocks/db.go in this case) with a whole bunch of generated code that is not meant to be touched. But we can now use the mock interface in the form of mocks.NewMockClientInterface(ctrl). All functions of the mocked interface are available in this mock and can now be overwritten with custom logic. In the example above we are responding with different returns for different IDs of the GetArticles() function and mock some other functions of the interface as well.
Now once we run the actual API integration tests, we don’t initialize the API router with an interface to the actual database, but with the just created mock interface. That way the actual database is never called.
r := GetRouter(nil, getDBClientMock(t))
(source)
The rest of the API integration tests is less magical and we just use a helper function to send an http request against an in-memory http server.
body := bytes.NewReader([]byte(test.body))
gotResponse, gotBody := testRequest(t, ts, test.method, test.path, body, test.header)
assert.Equal(t, test.wantCode, gotResponse.StatusCode)
if test.wantBody != "" {
    assert.Equal(t, test.wantBody, gotBody, "body did not match")
}
(source)
Every test request gets routed to its corresponding API endpoint, which internally calls the functions on the database interface, that we just mocked above.
14. Render Responses With go-chi/render
go-chi comes with a built-in way to render and bind data for your json API. This simplifies our responses to something simple as render.Render(w, r, article) and go-chi/render will take care of the rest and that it reaches the client in the right format.
func GetArticle(w http.ResponseWriter, r *http.Request) {
	article := r.Context().Value(m.ArticleCtxKey).(*types.Article)

	if err := render.Render(w, r, article); err != nil {
		_ = render.Render(w, r, types.ErrRender(err))
		return
	}
}
(source)
What’s happening behind the scenes here is that the article object implements the go-chi/render.Renderer and go-chi/render.Binder interfaces.
// Render implements the github.com/go-chi/render.Renderer interface
func (a *Article) Render(w http.ResponseWriter, r *http.Request) error {
	return nil
}

// Bind implements the the github.com/go-chi/render.Binder interface
func (a *Article) Bind(r *http.Request) error {
	return nil
}
(source)
Once these two functions are implemented, you are ready to go and the article object can be rendered in responses and bound in POST or PUT requests.
15. Documentation as Code With http-swagger
The openapi V3 specification is the industry standard and a great way to document your API for your users. However, you don’t want to end up writing an independent yaml or json file, that you have to update anytime you change something in your API.
On top of that it would be great if other developers working on the code have the same documentation of a given API function available. http-swagger comes in to fix these problems. The source-of-truth of your API documentation will remain in the docstrings of your handlers, but will be automatically rendered into an openapi spec and displayed via the swagger-ui. Let’s look into how it works.
You might have seen docstrings that look similar to this
// GetArticle renders the article from the context
// @Summary Get article by id
// @Description GetArticle returns a single article by id
// @Tags Articles
// @Produce json
// @Param id path string true "article id"
// @Router /articles/{id} [get]
// @Success 200 {object} types.Article
// @Failure 400 {object} types.ErrResponse
// @Failure 404 {object} types.ErrResponse
func GetArticle(w http.ResponseWriter, r *http.Request) {
(source)
These are a whole bunch of key words, interpreted by swaggo. Check the full documentation here. We are basically collecting all human readable text of the documentation here in the docstring of that handler function and also make links to the possible returned objects. If we change something here, we’ll just have to run make generate-docs, and we’ll get all files in the docs directory, which includes an openapi json, yaml and some go code, automatically generated. If we want to inject something into the spec, like the current build version, we can do so from the main file:
docs.SwaggerInfo.Version = version
(source)
All that’s left to do now is expose the swagger UI via an endpoint:
r.HandleFunc("/swagger", func(w http.ResponseWriter, r *http.Request) {
    http.Redirect(w, r, r.RequestURI+"/", http.StatusMovedPermanently)
})
r.Get("/swagger*", httpSwagger.Handler())
(source)
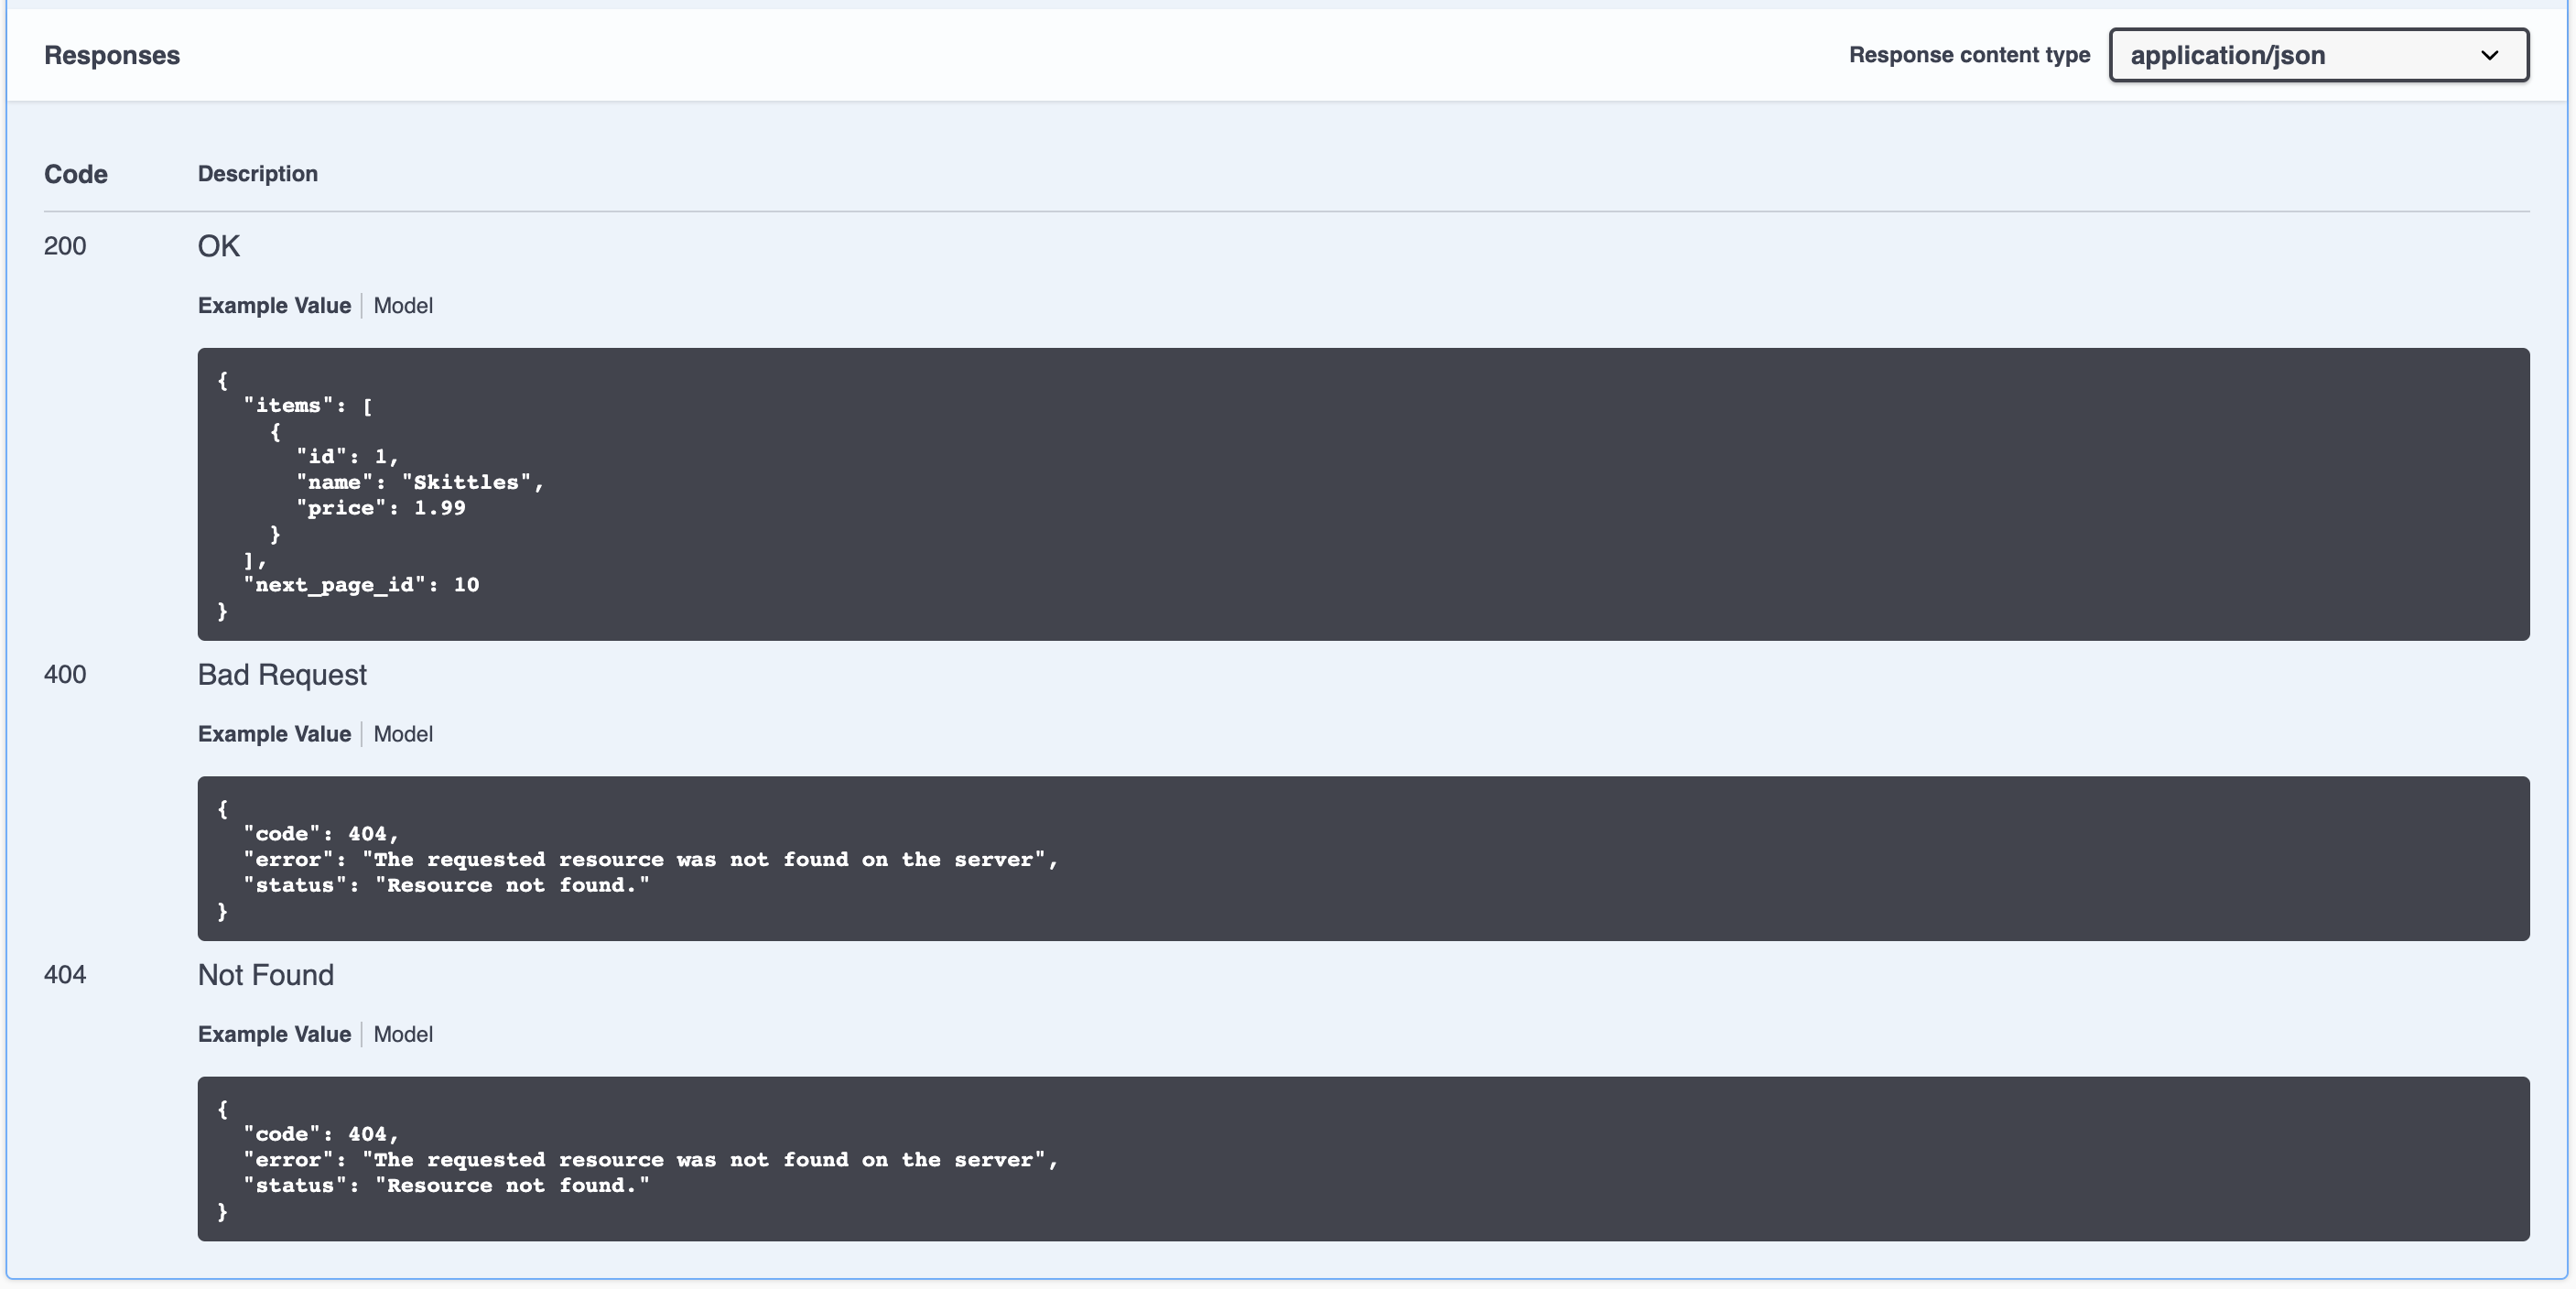
Now once that’s all set up, we can access the swagger UI via http://localhost:8080/swagger, and we get the fully featured swagger UI for our API:
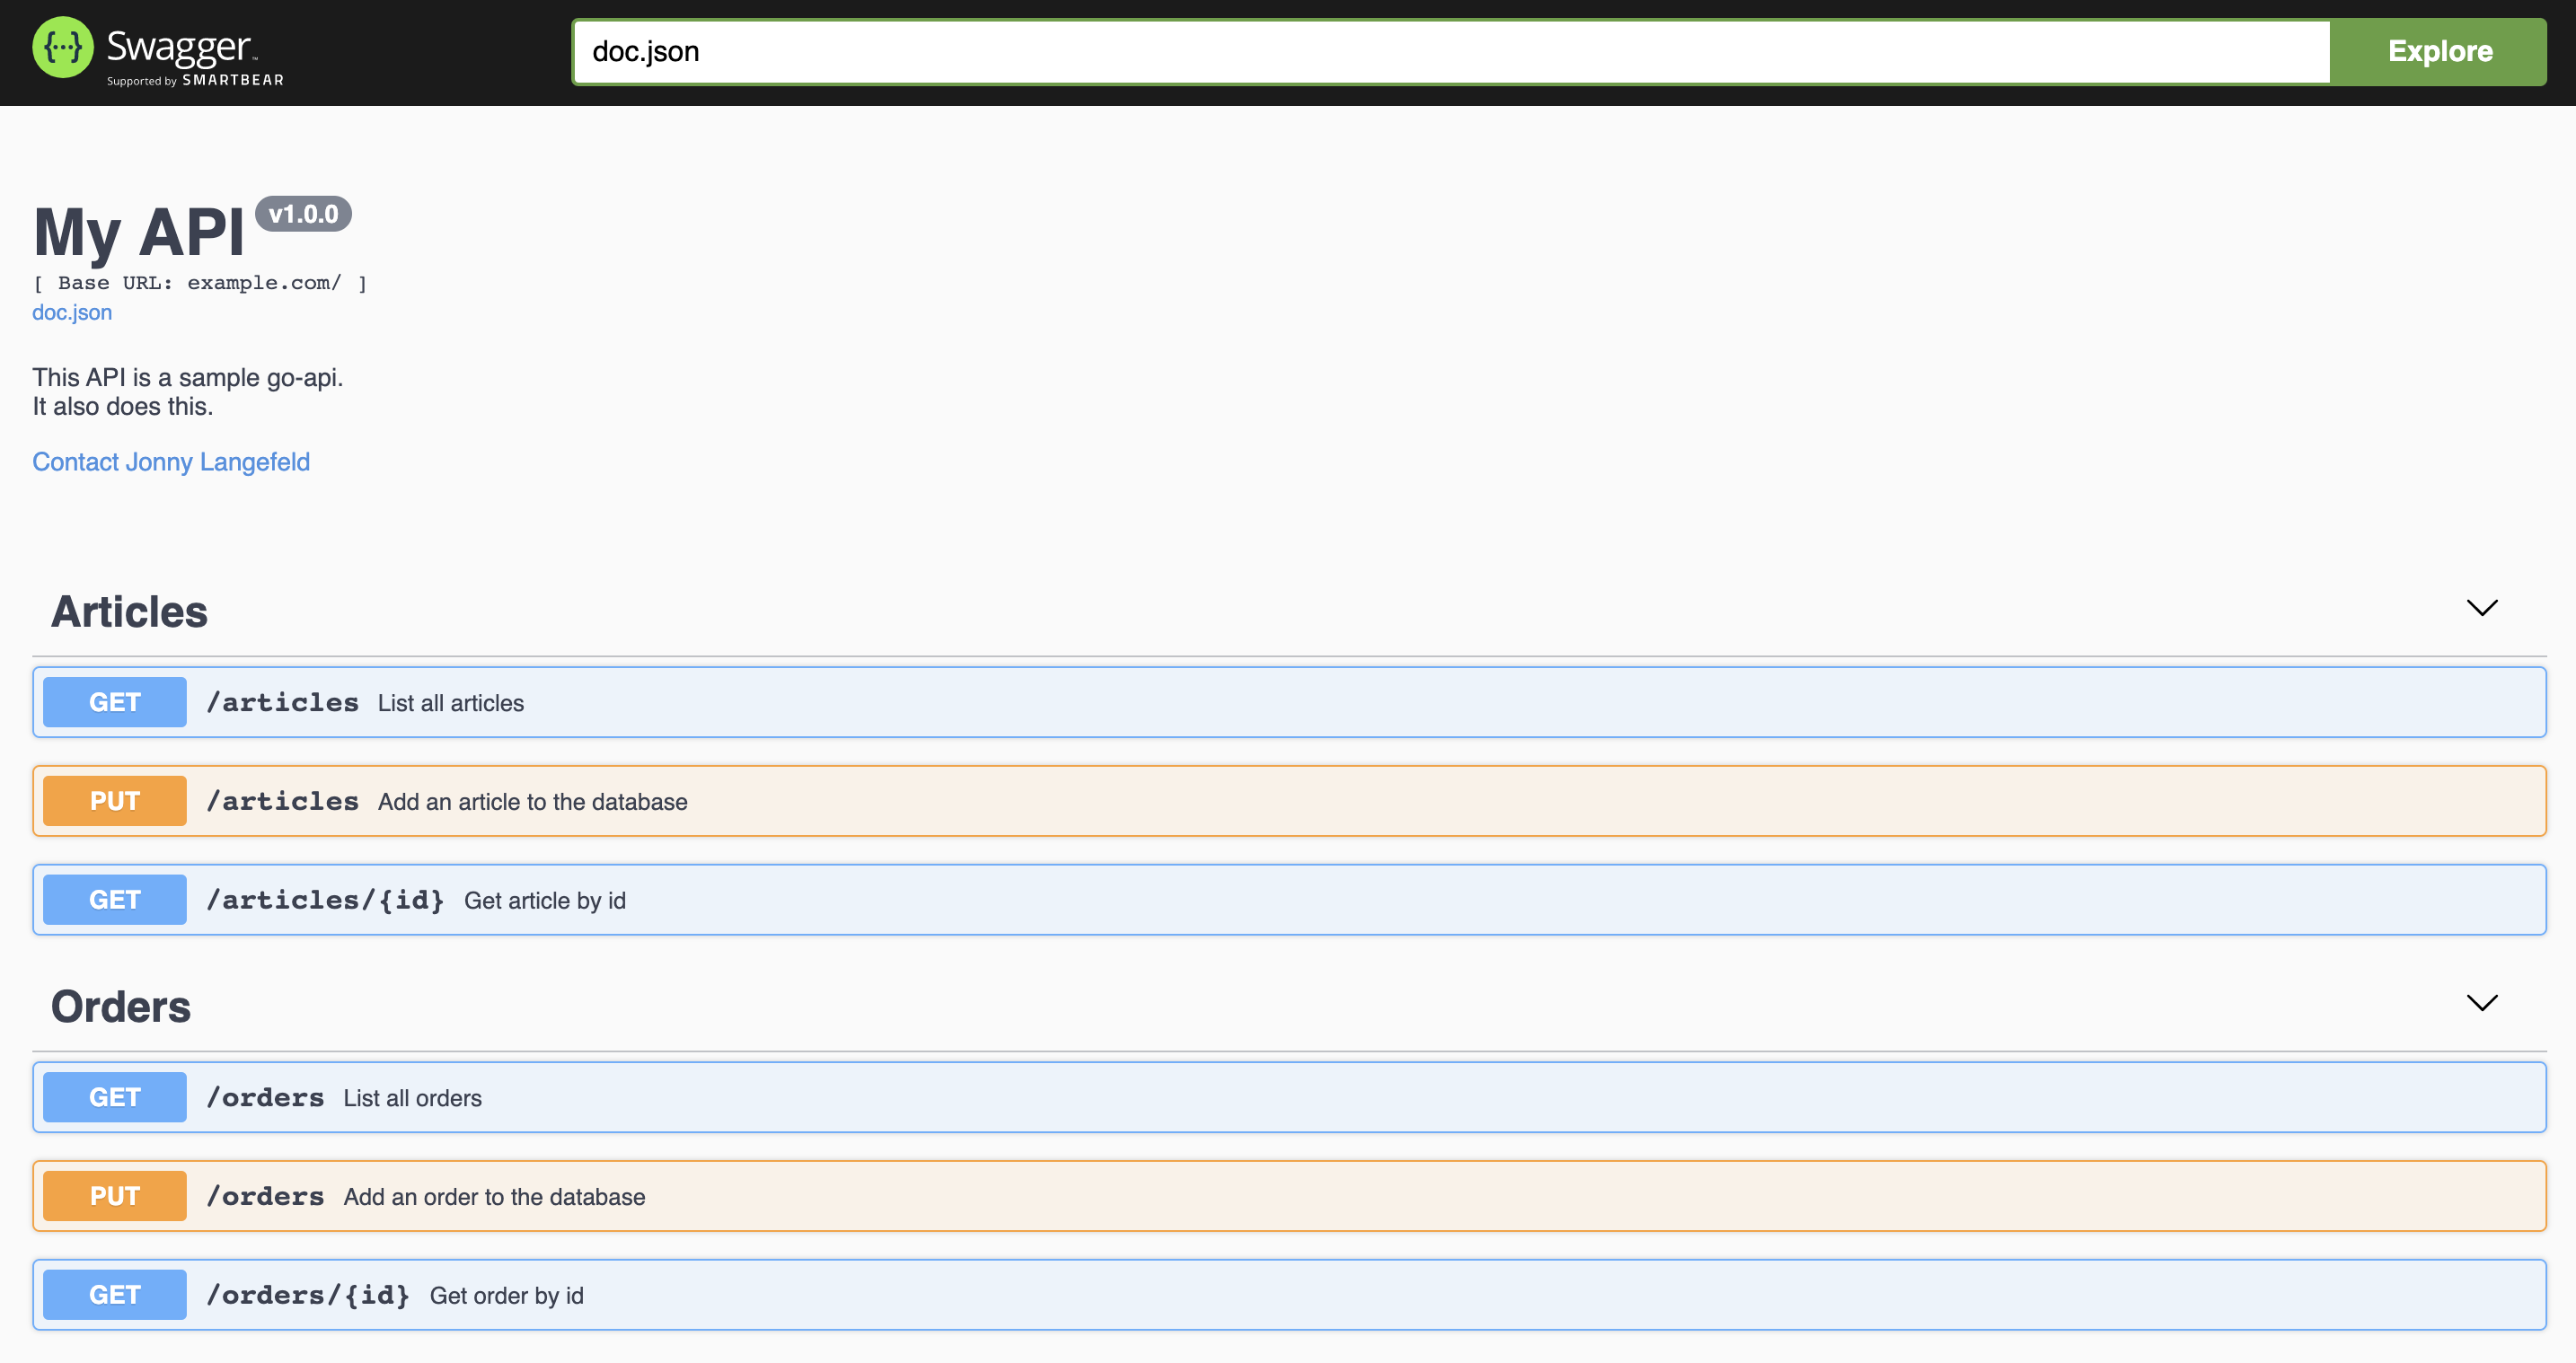
It comes with all the models and even examples that you can add via struct tags like the following:
// Article is one instance of an article
type Article struct {
	// The unique id of this item
	ID int `gorm:"type:SERIAL;PRIMARY_KEY" json:"id" example:"1"`
	// The name of this item
	Name string `gorm:"type:varchar;NOT NULL" json:"name" example:"Skittles"`
	// The price of this item
	Price float64 `gorm:"type:decimal;NOT NULL" json:"price" example:"1.99"`
} // @name Article
(source)
16. Staged Dockerfile
Last but not least, I always recommend to have a staged Dockerfile to allow us to use a distroless executable-stage image. That means your build stage is separated from the actual executable stage and will make your posted image way smaller.
Restricting what’s in your runtime container to precisely what’s necessary for your app is a best practice employed by Google and other tech giants that have used containers in production for many years. It improves the signal to noise of scanners (e.g. CVE) and reduces the burden of establishing provenance to just what you need.
(source)
That means that we build our binary through a docker container via the following:
FROM golang:1.14 as gobuild
ARG VERSION=latest

WORKDIR /go/src/github.com/jonnylangefeld/go-api
ADD go.mod go.sum main.go ./
ADD vendor ./vendor
ADD pkg ./pkg
ADD docs ./docs

RUN CGO_ENABLED=0 GOOS=linux GO111MODULE=on go build -mod=vendor -o go-api -ldflags "-X main.version=$VERSION" main.go
(source)
And then we just copy that binary over to a distroless docker image:
FROM gcr.io/distroless/base

COPY --from=gobuild /go/src/github.com/jonnylangefeld/go-api/go-api /bin

ENTRYPOINT ["/bin/go-api"]
(source)
Tags: go, golang, api, programming, software development, repo, ultimate guide, dockertest, chi, swagger, structured logging, best practices, how to