Jonny Langefeld
Software Engineer

All views expressed are my own and not affiliated with current or former employers.
How to write a Go API Part 2: Database Integration With GORM
This is part 2 of 3 blog posts on how to write a Go API. Start with the first part to build upon the repository. If you are only interested in the database integration, make sure to download the source code of the first part, as we are incrementally building upon it.
Most APIs are going to use some kind of database integration. Instead of just using raw SQL to avoid SQL injection and also to abstract the kind of database in the background, there are good reasons to use an ORM or Object-relational mapping (okay, there are also reasons against it). It basically means that you implement the database model entirely in the programming language and let the ORM tool do all the SQL generation and model mapping.
For this example, we are going to connect our API to a PostgreSQL database. For local development, it’s going to be the easiest to just spin up your own development database via Docker with
docker run -d \
    --name my-postgis-database \
    -e POSTGRES_PASSWORD=mysecretpassword \
    -p 5432:5432
    mdillon/postgis
The database is now already running in the background as a Docker container on your computer. We will get back to it later. We will be using GORM as the Go ORM implementation of choice.
First, we will need a model definition. For this tutorial, we will just use a simple object for some orders in an online store. Each order will have an ID, a description and a timestamp. To define the object, make a new sub directory in the project directory with mkdir model and create a new file called model.go inside of it (for instance with touch model/model.go). Add the following code into the model.go file:
package model

// Order is the database representation of an order
type Order struct {
    ID          int64  `gorm:"type:int" json:"id"`
    Description string `gorm:"type:varchar" json:"description"`
    Ts          int64  `gorm:"timestamp" json:"ts"`
}
As you can see, this is a Go object (struct) with all the attributes we need for our order. You could also say this Go object is a representation for a table in our database later.
Now let’s go back into our main.go file and let’s add "github.com/jinzhu/gorm" and the dialect _ "github.com/jinzhu/gorm/dialects/postgres" (Don’t forget the underscore as the dialect is not directly used in our main function) as well as our own model definition "go-api-base-project/model" to our imports :
import (
    "fmt"
    "github.com/jinzhu/gorm"
    _ "github.com/jinzhu/gorm/dialects/postgres"
    "go-api-base-project/model"
    "github.com/kataras/iris/v12"
)
These imports are needed for the next code block, which we will insert right at the beginning of the main() function, even before we call the newApp() function:
// Create the databse connection
db, err := gorm.Open(
    "postgres",
    "host=localhost port=5432 user=postgres dbname=postgres password=mysecretpassword sslmode=disable",
    )
// End the program with an error if it could not connect to the database
if err != nil {
    panic("could not connect to database")
}

// Create the default database schema and a table for the orders
db.AutoMigrate(&model.Order{})

// Closes the database connection when the program ends
defer func() {
    _ = db.Close()
}()
In addition to that we will register another endpoint in the newApp() function, just like we have done before. We need to instantiate a variable for the result, which is a slice of the model we defined earlier. The endpoint /orders will perform a database request via db.Find(&orders) and return it via ctx.JSON(orders). Add the following code at the end of the newApp() function (but above the return app statement):
// Define the slice for the result
var orders []model.Order

// Endpoint to perform the database request
app.Get("/orders", func(ctx iris.Context) {
    db.Find(&orders)
    // Return the result as JSON
    ctx.JSON(orders)
})
It appears that the new endpoint is making use of the db object we created in the main() function. In order for it to be used in the newApp() function, we need to pass it down. Therefore add the payload db *gorm.DB to the newApp() function like this:
func newApp(db *gorm.DB) *iris.Application {

}
and pass the db object down when the newApp() function is called in the main() function:
app := newApp(db)
The updated main.go file will now look something like this:
package main

import (
    "fmt"
    "my-go-api/model"

    "github.com/jinzhu/gorm"
    _ "github.com/jinzhu/gorm/dialects/postgres"
    "github.com/kataras/iris/v12"
)

func main() {

    // Create the databse connection
    db, err := gorm.Open(
        "postgres",
        "host=localhost port=5432 user=postgres dbname=postgres password=mysecretpassword sslmode=disable",
    )
    // End the program with an error if it could not connect to the database
    if err != nil {
        panic("could not connect to database")
    }

    // Create the default database schema and a table for the orders
    db.AutoMigrate(&model.Order{})

    // Closes the database connection when the program ends
    defer func() {
        _ = db.Close()
    }()

    // Run the function to create the new Iris App
    app := newApp(db)

    // Start the web server on port 8080
    app.Run(iris.Addr(":8080"), iris.WithoutServerError(iris.ErrServerClosed))
}

func newApp(db *gorm.DB) *iris.Application {
    // Initialize a new Iris App
    app := iris.New()

    // Register the request handler for the endpoint "/"
    app.Get("/", func(ctx iris.Context) {
        // Return something by adding it to the context
        ctx.Text("Hello World")
    })

    // Register an endpoint with a variable
    app.Get("{name:string}", func(ctx iris.Context) {
        _, _ = ctx.Text(fmt.Sprintf("Hello %s", ctx.Params().Get("name")))
    })

    // Define the slice for the result
    var orders []model.Order

    // Endpoint to perform the database request
    app.Get("/orders", func(ctx iris.Context) {
        db.Find(&orders)
        _, _ = ctx.JSON(orders)
    })

    return app
}
As always at this point you can build and run your application again (go build && ./my-go-api).
To see that everything went well, you can install psql via brew install postgres and use it in your command line to see if the database table was created correctly:
echo "SELECT * FROM orders" | \
psql "host=localhost port=5432 user=postgres dbname=postgres password=mysecretpassword sslmode=disable"
The result should look like this:
 id | description | ts
----+-------------+----
(0 rows)
This table was entirely created by your Go application. Let’s add some life to it. Execute this in your command line:
echo "INSERT INTO orders VALUES (1, 'An old glove', 1550372443000);\
      INSERT INTO orders VALUES (2, 'Something you don''t need', 1550372444000);" | \
psql "host=localhost port=5432 user=postgres dbname=postgres password=mysecretpassword sslmode=disable"
If you execute the SELECT command from above again, you will now find the two database entries:
 id |       description        |      ts
----+--------------------------+---------------
  1 | An old glove             | 1550372444000
  2 | Something you don't need | 1550372444000
(2 rows)
But the most fun part is, if you now enter locahlost:8080/orders in your browser, you will get a JSON response of the orders we just inserted:
[
    {
        "id": 1,
        "description": "An old glove",
        "ts": 1550372443000
    },
    {
        "id": 2,
        "description": "Something you don't need",
        "ts": 1550372444000
    }
]
Tadaaa 🎉 we integrated the database. You can download the complete source code for this blog post from here.
Make sure to continue reading the third part on how to test your API.
Tags: go, golang, api, programming, software development, repo, go base project, gorm
How to write a Go API Part 1: A Webserver With Iris
Today we are going to look at my favorite setup for an API built with Go. We will build a simple application that includes all the basics to build a powerful, scalable web app. Keep on reading if you are interested in how to get your first Go API kicked off. As of today the main packages used include Iris, GORM and Dockertest. I will be guiding you through a follow-along tutorial in three parts, one for each of the main packages.
For those who are just interested in the finalized code, the complete repository with all files can be found here. This tutorial assumes Mac OS as the operating system, but of course everything works on other systems too (It is just some extra work to lookup the respective commands 😉).
Where to Start
If you haven’t yet, install Go. For Mac OS it is the easiest to use brew with the command brew install go. Then, we initialize our project. With Go version 1.11, modules were introduced, which means from now on you don’t have to develop all you projects in GOPATH anymore. You create your working directory wherever you want. Start by typing
mkdir my-go-api-projectto create the directorycd my-go-api-projectto change into itgo mod init my-go-apito initialize our project
With these commands, you just initialized your Go module. In your directory, you will now find a go.mod file. So far it’s pretty empty and only contains the package name you gave it, but it’s gonna fill up later with all the dependencies we will be using.
Next, we will create a main.go file, as every Go program needs one. You can do so by typing
echo "package main" >> main.go
into your command line. Let’s first write a quick hello world program to see if everything works with your Go installation. You can open the current directory with the editor of your choice. I will just be posting the necessary code in here. Fill your main.go package with the following code (we already created the first line through the command above, I just included it here for completeness):
package main

import (
    "fmt"
)

func main() {
    fmt.Printf("Hello World")
}
Now run go build in your terminal in the current working directory. A new file with the package name you gave in the go mod init command earlier has been created. Run the file with ./my-go-api. If you see the output Hello World, everything is working as expected.
Getting Started With Iris
Iris is one of the more popular, fast, and easy-to-use web frameworks for Go. Of course any other could be used, but I decided to use Iris for now, even though there are some critiques out there.
Let’s change our simple hello world program from above, so that an actual web server is started that sends a Hello World response. Replace the contents in the main.go file with the following code:
package main

import (
    "github.com/kataras/iris/v12"
)

func main() {
    // Run the function to create the new Iris App
    app := newApp()

    // Start the web server on port 8080
    app.Run(iris.Addr(":8080"), iris.WithoutServerError(iris.ErrServerClosed))
}

func newApp() *iris.Application {
    // Initialize a new Iris App
    app := iris.New()

    // Register the request handler for the endpoint "/"
    app.Get("/", func(ctx iris.Context) {
        // Return something by adding it to the context
        ctx.Text("Hello World")
    })

    return app
}
The comments should explain what we did there. Note that I now import github.com/kataras/iris/v12. Try to run
go build
now. Your binary my-go-api will be updated, but more importantly the command just downloaded all the packages needed from github.com. Check out your go.mod file now, you will see it now contains all the dependencies of Iris. Run the app again with
./my-go-api
and access locahlost:8080 in your browser now. Congrats 🎉! You just started your own API.
Variable Endpoints
Now, let’s create one new endpoint with a variable path. Just add another app.Get reference right next to the existing one:
// Register an endpoint with a variable
app.Get("{name:string}", func(ctx iris.Context) {
    ctx.Text(fmt.Sprintf("Hello %s", ctx.Params().Get("name")))
})
The ctx.Params().Get("name") part accesses the variable from the context. Don’t forget to import the package fmt now, since we need it to generate the string with a variable:
import (
    "fmt"
    "github.com/kataras/iris/v12"
)
go build and run your application again with ./my-go-api. Check out locahlost:8080/Bill in your browser.
You did it 🎊! From here you can now expand and scale your API. You can download the complete source code for this blog post here.
Make sure to continue reading part two on how to integrate a database.
Tags: go, golang, api, programming, software development, repo, go base project, iris
Python Flask Base Project
This blog post describes my favorite setup of a project skeleton for a Python Flask web app or api. Keep on reading if you are interested in best practices for a Python Flask folder structure, architecture setup and testing. The repository with all files can be found here. It’s helpful for this blog post to download the repository. I’ll explain all necessary files and the folder structure.
Docker First
Like many of my projects, I like to dockerize everything. This also leads me to the only prerequisite: have Docker installed (I made a video how to install it). I like that everything is included with Docker and I can virtually run it on any cloud platform (because all of them offer container hosting services / webapps). Apart from that, I’ve often had the case, that one Python package doesn’t like the other. So if you happen to develop multiple projects on your computer ever, then it’s very likely that you run into similar issues. Docker takes care of it and separates each project from one another. It’s like a lightweight linux instance with only Python installed. I don’t like Python’s virtualenvs too much, because it copies all Python dependencies into my working directory.
The container is built on a lightweight linux container. So let’s start with the Dockerfile. In case you don’t know what that is, I also recommend watching the linked video above. The steps are as follows:
- Required packages from
requirements.txtare installed - All files required by the app are copied inside the container
- Tests are executed on container build
- The app will be executed with the entrypoint
python app.py:
FROM python:3.7-alpine3.7
COPY ./requirements.txt /requirements.txt
RUN pip3 install -r /requirements.txt
COPY ./app /app
WORKDIR /app
RUN pytest
CMD [ "python", "app.py" ]
The Dockerfile is necessary to build the container. But as you might have guessed, we still need the files the Dockerfile is referring to, so let’s look into the file structure before you start the build.
File Structure
Let’s start with the high level structure and we will go into more details after that:
├── Dockerfile
├── app
│   ├── app.py
├── deploy.sh
├── readme.md
└── requirements.txt
So there’s the Dockerfile we already talked about, there’s an app/ directory that contains all files the Python app needs, there is a deploy.sh script, which contains a skeleton for a bash deployment script to any cloud provider (this file can be ignored if not needed), there’s a readme as in any good repo and there’s the requirements.txt that was mentioned in the Dockerfile. The Dockerfile copies the app/ directory and the requirements.txt file inside the container and installs all packages defined in the requirements.txt file.
The requirements.txt File
The file structure of this is super easy. There’s basically one row for each package and two equals character and then the version. You can lookup the latest version here. I put the necessary packages to get started in there, but you probably want to add the packages you need.
Flask==1.0.2
requests==2.19.1
pytest==3.8.0
Now that we got that packages covered, that get installed on Docker build, only the app/ directory is missing.
The app/ Directory
Actually in the simplified folder structure above, I left most of the contents of the app/ directory out to confuse less in the beginning. Bet now that we unwrapped the different parts of the repo, let’s look at it’s contents:
├── app
│   ├── app.py
│   ├── templates
│   │   └── index.html
│   ├── static
│   │   ├── css
│   │   │   ├── bootstrap.min.css
│   │   │   └── custom.css
│   │   ├── img
│   │   └── js
│   │       ├── bootstrap.min.js
│   │       ├── custom.js
│   │       └── jquery-3.3.1.min.js
│   ├── pytest.ini
│   └── testing
│       ├── integration_test.py
│       └── unit_test.py
- The
app.pyfile is where all the magic happens and I will go deeper into it in a minute. - The
/templatesdirectory will contain html template files for all main screens within your app. Think of it as the layout, and the logic of your app fills it later with contents. The template language is called Jinja2. It has cool features like loops, variables and if statements right inside of the template. (The instagram website uses this Template language, isn’t that cool?) - The
/staticfolder contains all not variable web elements like css scripts, javascripts or images. I’ve pre-loaded this base repository with bootstrap and jquery as well as custom css and javascripts, but you can delete what you don’t want. Not the unique way of including those file into your html site though. If you open theindex.htmlfile, where we include bootstrap and jquery, you’ll find something like<link rel="stylesheet" href="{ { url_for('static', filename='css/bootstrap.min.css') }}" />in the header. This already calls a Jinja function to generate the url that directs to the static folder and then the sub folder/cssand then tobootstrap.min.css. - The
pytest.inifile contains some preferences for testing - The
/testingdirectory contains the actual scripts for unit tests and integration tests. With unit tests I test the single functions defined in theapp.pyscript and their outputs, and with integration tests, I spin up an entire Flask test client, that can query itself for API calls.
Now that we covered the entire file structure, the last part missing is to look into the Python files:
The app.py File
The overall structure of the file is as follows (described in meta code):
import core packages

import third party packages

# define needed classes and functions functions
def classes_and_functions

app = Flask(__name__) # define the Flask app

# definition of the endpoints
@app.route('/', methods=['GET'])
def index():
    """Return the index.html page"""
    return render_template('index.html')

# start the app
if __name__ == '__main__':
    app.run(host='0.0.0.0', port=80, debug=True)
I think the meta code including the comments is pretty self explanatory. Eventually I will add an /utils directory that allows importing own classes and functions.
The integration_test.py and unit_test.py files
The pytest.ini file defines that it will look in the /app directory inside the Docker container for a directory called /testing. Inside this directory it will run all Python files that begin with test_ or end with _test. Hence our two files in the directory will be executed. Both have the same imports:
import pytest
import sys
sys.path.append('/app')
from app import app
The last two lines of the code block above make sure that the testing file always looks in the /app directory in the root of the Docker container. Inside there, it will look for the app.py file (because of the from app keyword) and for the app variable inside that file (because of the import app keyword).
pytest will just run through all function that start with test_ in their name. I’ve added a few examples to those files, so it’s the easiest to check them out in the repo.
For the test_integration.py file, after the import block, there is a pytest fixture defined. Mainly it spins up the Flask test client once and keeps it alive during the entire run of the integration test. This is necessary for when you have logins to your app and certain requests to your endpoints only work if a user is logged in. So one of your first tests would then be to login a sample user.

Project Setup in PyCharm
I like the testing and debug features of PyCharm, so I included the .idea/ directory into the repo. In there are definitions like to execute the tests inside the Docker container. Or when you click the debug button, it will spin up the container including the debugger so your brake points will work inside the containers. So when you open this repo with PyCharm, this would already be implemented.
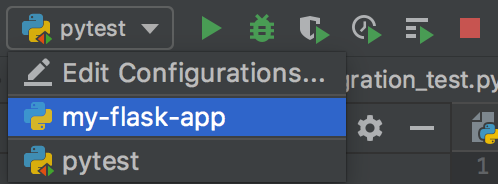
Look out for the run configurations within PyCharm. The my-flask-app configuration is to run and debug the actual app (inside the container) and the pytest configuration runs and debugs the tests (inside the container). I configured the run configurations so they would mount the app/ directory inside the container. That means you don’t need to rebuild the container for every run (only once in the beginning).
Next Steps
I have a few more ideas that I want to include in upcoming updates:
- a
utils/directory that excludes all classes and functions, which then can be imported in theapp.pyfile - a sample database connection with an ORM (object-role modeling) implementation
Tags: python, programming, software development, repo
Hello World!
Welcome! You found me online!
This is my first post on my personal website, on which I post things I’m interested in. I will use this space for thoughts, ideas, experiences and dreams.
My name is Jonathan Langefeld, but almost everybody calls me Jonny. My mum used to call me Jonny from a young age and it stated in 6th grade, when a teacher picked up my nickname, that everybody started calling me Jonny.
I live in Silicon Valley where I am persuing a professional carrier as computer scientist. Over the years I gained a broad skill set that reaches from software development over project management all the way to data science and machine learning. If you want to learn more about me, head over to the about page or check out my resumé.
What you can expect:
I love talking about all kinds of topics and am generally interested in what you have to say. If you let me choose the topic though, there is a high likelyhood for it to circle around finance, business and entrepreneurship or computer science. This can long from the stock market, investing, retirement savings, real estate, passive income, dividends, cryptocurrencies, startups, company histories, small businesses or digital nomadism all the way to software development, coding challenges, Docker, Python, web development, machine learning, data science or deep learning. I love to combine those topics, hence I am very interested in young fintechs and digital payments/stores of value and things of that sort.
If you have any question, feel free to reach out to me through one of my social media channels or via the contact form.
💻
Tags: init, first post, hello world